CDS tutorial and interview questions
SAP CDS
What are ABAP CDS Views?
In a nutshell, ABAP CDS Views is an important technology for modern application development on SAP systems and should not be overlooked. They provide enhancements in terms of data modelling and enable improved performance when combined with SAP HANA database.
ABAP CDS Views allow developers to create semantically rich data models which the application services expose to UI clients. It is the central pillar of S/4HANA development and is used as the core technology in most of SAP’s programming models.
Whether it is ABAP Programming Model for SAP Fiori, ABAP RESTful Application Programming Model, SAP Cloud Application Programming Model or S/4HANA Embedded Analytics CDS Views is the main technology used for data querying and modelling.
Created using an enhanced version of openSQL syntax, ABAP CDS Views reside in the application server (data dictionary) but process the logic in the database.
While the data in SAP is still physically stored in transparent tables, CDS Views are an abstraction layer on top of the tables for data modelling purposes. They understand the relationship between database tables and hide the complexity from the ABAP programmer.

ABAP Dictionary Views vs. ABAP CDS Views
If you are familiar with ABAP Dictionary views, then you can think of CDS Views as a much more sophisticated version.
ABAP Dictionary views just link database tables, whereas CDS views bring many more features. Such features include calculations, aggregations, more variations of table joins, and they can also be stacked with each other. The comparison is illustrated by the diagram below:

Why ABAP CDS Views? – Classic vs Code Pushdown approach
The classic SAP development approach has been to keep the unnecessary load away from the database. Developers would select the required data from a database and do further processing and manipulation on the application server. The code would become complex (as its majority has been built for performance reasons) through the use of indexes and added no value to core business functions.
With the invention of SAP HANA database and consequent introduction of ABAP CDS Views this approach has changed. The new programming paradigm is called ‘code pushdown’ or “code to data”. The rule-of-thumb is to ‘do as much as possible in the database to get the best performance’.
And “as much as possible” means: all expensive calculations, aggregations and string operations should be done on the database level with only the resulting sets to be transferred to the application layer. SAP HANA database is optimised to complete such tasks. This leads to performance gains and reduction of the the complex application code. For comparison – huge amounts of data had to be transferred for processing with the classic approach. In some cases this could cause short dumps due to memory consumption limits.
SAP HANA is capable of aggregating on the fly. There is no need for pre-built aggregates and indexes since the data is organized using column stores. Also, in an S/4HANA system the data model has been simplified, by getting rid of tables necessary for aggregations and indexes.
The classic vs code pushdown (data centric approach) comparison can be represented by the following diagram:

Code Pushdown – Example
So, what does ‘code pushdown’ really mean? I am using an example of a CDS View below to explain:

Apart from regular fields selection from database table SBOOK this CDS view:
- Uses a cases statement, based on the value of CLASS field it will return a corresponding value: ‘Economy’, ‘Business’, ‘First’.
- Does a currency conversion from source currency to USD using a built-in function
- Calculates the difference between order date and flight date using a built-in function
In the classic approach, all these calculations and conversions would have been done on the application server in ABAP. With CDS Views it is possible to do so on the database level.
Consumption of CDS Views
CDS Views can be consumed in many ways as a data source. Whether it is well known ALV report using ALV with Integrated Data Access (IDA) or modern SAP Fiori application with the CDS view exposed using SAP Gateway in the oData format. You can also quickly build FIORI apps on top of CDS Views with SAP FIORI Elements templates. CDS Views also work very well with SAP’s analytical apps using analytics related annotations and analytical engine. Below is a simplified diagram of CDS Views consumption:

The Power of Annotations
As already mentioned, CDS views are created with openSQL which can be enriched with annotations. These annotations fall into different categories: semantic (used for S4HANA Embedded Analytics), analytical (used by analytical tools like Bex, Lumira), UI annotations (used for FIORI applications). The UI annotations are an interesting case. By marking the CDS view with relevant annotations and the use of SAP FIORI Elements we can generate a FIORI app without writing a single line of JavaScript code. The whole UI generation is driven by the CDS View and the UI annotations.
There are some drawbacks however, e.g. only certain floorplans are supported, and it is not as flexible as a freestyle SAPUI5 app. On the other hand, it is a great tool to quickly generate reports with filter bars. This is demonstrated by the illustration below. On the left-hand side you can see a CDS View with UI annotations and on the right-hand side is the generated FIORI app.

- The search annotation enables a search dialogue
- Annotation responsible for adding the Sales Order ID field in the selection dialog (filter bar)
- Annotation which sets the position of the Sales Order ID field in the output table.
Part#1. SAP CDS views Demystification
Introduction:
CDS stands for Core Data Services. This is the new programming paradigm within new SAP environment specifically S/4HANA systems. CDS views can be created without HANA DB as well but I will focus on an S/4 system with a HANA DB as that is the future road map of SAP .
HANA is an in-memory database which enables high speed data processing. With this awesome feature, SAP has tried to put all the logic calculations back into the database instead of the application server as it was done prior to HANA. So CDS views are the new programming design concepts which can achieve Code-to-Data paradigm which actually means Code push down into the database for processing. CDS is an enhancement to standard SQL technology which runs within ABAP layer which means that the design time objects are created in the ABAP layer and can be transported by regular Transport mechanism with a TR number assigned to each object. The Design Time object is created in database i.e. the HANA DB which enables Code-to-Data shift.
As I mentioned, CDS is an enhancement to standard SQL language, it has all SQL features as below;
- DDL – Data Definition Language. Used to CREATE Table, MODIFY Table etc.
- DQL – Data Query Language. Used to READ data.
- DCL – Data Control Language. Used to configure ‘SECURITY’
- Expression Language – Mathematical calculations, conditions Case..Endcase etc.
Part#2. Create a Basic CDS view
Whenver a CDS view is created and activated, these 2 objects gets generated. As I mentioned in the introduction, this enables Code-to-Data paradigm shift.
- DDIC SQL view – It is a Design Time Object and can be seen in tcode- SE11
- HANA View – It is a run time object and gets created in HANA DB
BASIC CDS VIEW:
For all the view I create, I will use FLIGHT demo tables and data to showcase the CDS technology.
- Create an ABAP project within Eclipse by logging in to S4 HANA system.
- Right click on your username under Local Objects and choose New->Other ABAP Repository Objects. Core Data Services->Data Definition.


A simple view will be created. All the statements starting with ‘@’ at the start of the view are called ‘ANNOTATIONS’ and they play a very important role in design and development of the CDS view. They are the ‘Building Blocks’ behind the CDS views configuration. They also define how the CDS view will behave in different scenarios. I will talk about different kind and mostly used annotations.

Now let’s talk about the default annotations while creating the Basic view
- @AbapCatalog.sqlViewName: ‘sql_view_name’.
Within first annotation, provide the SQL view name. This is the DDIC SQL view which gets generated once the CDS view is activated and can be seen in tcode SE11. This name must be of less than or equal to 16 characters as per DDIC SE11 view name limitations. Also, the CDS view name and the SQL view name can NOT be same. So choose a logical name, probably something similar to the CDS view name to keep it consistent.
- @AbapCatalog.compiler.compareFilter: true:
This annotation defines the behavior of the filtering the data i.e. this first compare the filter conditions and if they match then only the data is fetched. If the CDS view has join conditions, they are executed only after the filter conditions are matched. In DDIC views data if first fetched and then filtered.
- @AbapCatalog.preserveKey: true
Another important annotation of CDS views. As you know all the DB tables in SAP do have Keys defined and the CDS Views are always created on top of those DB tables. Now any DB table can have multiple keys defined and you might not want those keys to be the key fields of your view. So if you set this annotation as true, the only fields you define as Key Fields within your CDS view by adding word ‘Key’ in front of those fields will be the Key fields for the CDS view and the DDIC SQL view which gets generated.
If you set this as ‘False’ the DB table key fields will be defined as Key fields for the views as well, regardless of you adding word ‘Key’ in front of fewer fields.
- @AccessControl.authorizationCheck: #NOT_REQUIRED
This annotation is used to add ‘Security’ piece to the CDS view. When CDS view is ready to be rolled out to a bigger audience within or outside the organization, it is very important to restrict the data based on the authority. We will look into creation of authorization objects in the later part. For now let’s keep it #NOT_REQUIRED
- @EndUserText.label: ‘CDS View type #BASIC’
This annotation is used to apply business labels other than labels attached in the DB tables, to the fields within the CDS view. This annotation will override the DB table business label and provides what you specify with this annotation.
Let’s add the fields to the CDS view by right click. You can either choose to insert all fields or one by one;

Add the below fields to the CDS view;

I made the field ‘Client’ or ‘MANDT’ disabled due to the reason that this CDS view is created in the ABAP system and the client is handled by the system itself. Now activate the CDS view.
As mentioned before, 2 more objects get created when the CDS view is activated? A DDIC SQL view is created and a HANA view is created;
-Goto Tcode SE11 and check the DDIC SQL view;

-Check the HANA view in Eclipse or HANA Studio platform as below;

You can also check the ‘CREATE’ statement generated by the system.

To summarize, we created a basic CDS view and looked at the default annotations which are already configured when a CDS view is created. Also, we saw the different run time and design time objects which gets created with the view activation.
Part#3. CDS View with Expressions and Session Variables
This is the 3rd blog post on the CDS detailed explanations after the Introduction post. Refer to the Introduction and blog post indexes here:
https://blogs.sap.com/2019/10/21/part1.-sap-cds-views-demystification/
As you saw in the previous blog post, in the Basic CDS view the data has been read with a simple ‘Select’ statement. So how about some business logic calculations? Can we have some Mathematical Expressions configured in the CDS view? Yes, absolutely, let’s create a simple CDS view with an Expression to calculate the available seats in business class from table SFLIGHT;

Check the output below. Column Seats_Avlbl is the result of a mathematical expression configured within CDS view.

=> ‘WHERE’ CLAUSE AND SESSION VARIABLES:
Let’s check how to add a ‘WHERE’ clause to filter the data and how to make use of ‘Session Variables’. Similar to ABAP session variables like sy-datum for current Date, sy-uzeit for current Time etc. , CDS views editor also has session variables which can provide these values. See below the syntax for Client, system_date, system_language, user can be determined within ‘WHERE ‘ clause.

Select ‘system_date’ to compare ‘Current Date’ with Flight Date.
@AbapCatalog.sqlViewName: 'ZSQL_VIEW_EXPRSN'
@AbapCatalog.compiler.compareFilter: true
@AbapCatalog.preserveKey: true
@AccessControl.authorizationCheck: #CHECK
@EndUserText.label: 'CDS view with  Expression'
define view ZCDS_VIEW_EXPRESSION as select from sflight
 {
    key carrid,
    connid,
    seatsmax_b,
    seatsocc_b,
    fldate,
    (seatsmax_b - seatsocc_b) as Seats_Avlbl
    }


where fldate <= $session.system_date
In summary, we saw how to add Expressions, Where Clause to the CDS view and how to use Session variables to get some system data.
Part#4. Consume CDS View in an ABAP Program
CDS view is also called a VDM i.e. Virtual Data Model as there is no data persistence happening. All the SQL like code written in a CDS view pick the data from Base tables directly or via other CDS view at RUNTIME . The actual data still remain in the SAP Base tables and CDS views remains a virtual data model. Now in a scenario, we have created a complex CDS view which has lot of business logic implemented into it and we want to use the data coming out of this CDS view in an ABAP program, can this be possible? Yes, it is possible via new ABAP syntax. Let’s look at it.
1. We will use the Basic CDS view we created before to be consumed via ABAP program;
@AbapCatalog.sqlViewName: 'ZSQL_BASIC_VIEW'
@AbapCatalog.compiler.compareFilter: true
@AbapCatalog.preserveKey: true
@AccessControl.authorizationCheck: #NOT_REQUIRED
@EndUserText.label: 'CDS View type #BASIC'
define view ZCDS_BASIC_VIEW as select from sflight {
 //sflight
 --key mandt,
 key carrid,
 seatsmax_b,
 seatsocc_b,
 seatsmax_f,
 seatsocc_f
}
2. Within ABAP perspective in Eclise or HANA Studio, right click on your user under Lcal Objects within an ABAP project to create an AABAP program


- Consume the CDS Basic view we created via this ABAP program. Note the new ABAP syntax used for this purpose.
*&---------------------------------------------------------------------*
*& Report zconsume_cds
*&---------------------------------------------------------------------*
*&
*&---------------------------------------------------------------------*
REPORT zconsume_cds.

Select * from ZCDS_BASIC_VIEW into table @data(lt_itab).

cl_demo_output=>display_data( lt_itab ).
2. Hit F8 or Execute the program to check the output.

In summary, there are lot of scenarios in projects where we write complex CDS views and we need to consume them into an ABAP program for different business needs. In this blog post, we looked at the new ABAP syntax to consume a CDS view.
Part#5. CDS View Extension
SAP provides multiple standard CDS view related to each functional module and also during a project implementation you will create tons of CDS custom views. Since the CDS views are just virtual data models, you will want to reuse the view created in one project or for one object to another project/object. Let’s assume you created a CDS view with 5 fields on TABLE A and for another scenario in a different project you need 8 fields from the same TABLE A. So instead of creating new CDS view from scratch, we can use the concept of CDS View extension and re-use the previous view we created and extend it with 3 new fields.
- Create a CDS view with Template ‘Extend View’


Below is the default view generated;

Now add the SQL view name and other properties;
- SQL View name: ZSQL_EXTEND_VIEW
- Let’s extend the view we created before: ZCDS_BASIC_VIEW. This could be a standard view as well. Any view which you would like to extend with new fields.
- Hit CTRL + SPACE to see the fields which you would like to extend with. This will use the datasource/table used in the view we are extending i.e. table SFLIGHT in our case.

Add the fields you would like to extend and ‘Activate’ the view.

Hit F8 and check the output. You can see that the 3 new fields are available in this view together with all other fields of the view we extended;

Hit F8 and check the output. You can see that the 3 new fields are available in this view together with all other fields of the view we extended;

In summary, we looked at the re-usability concept in this blog post, which is very important to reduce the development effort and to follow the Best SAP Practices as well. Instead of creating from scratch, it is highly important to know about SAP delivered standard CDS views to re-use them in your project to meet specific business requirements.
Part#6. Parameters in a CDS view
In the previous blog post, we saw simple examples of CDS views which are a type of a select statement and you could surely add ‘WHERE’ clause to filter the data. But this where clause is static with a non-parameterized view and may not fulfill the project requirements where a user interaction is required. So it is absolutely possible to add ‘Parameters’ to take user input and filter out the data from the CDS view accordingly;
- Create a new CDS view;

You can choose the parameter template for easy code;

This is what we get as the default structure of the CDS view with Parameters. Look at the ‘with parameters’ clause got added.

2. Add the SQL view name and table name. To the ‘with parameters’ clause, add the parameter name before colon and the data type after colon as mentioned above. For ‘Data Type’ you can either add the data element directly as we used to do in classic ABAP to declare a variable i.e. or you can add primitive data type like abap.<data ype>(<len>) e.g.: char(3) ;
Data Element – S_CURRCODE;

ABAP Premitive types – abap.char(3);

To use the parameters to filter out the data we need to apply a ‘WHERE’ clause and use the parameter with $Paramter keyword i.e. $Parameter.<parameter name> OR just the parameter name prefixed with a colon i.e. :<parameter name> . Let’s check how the CDS view look like now;

OR

- Active the CDS view now and hit F8 to execute. Checkout the user input pop up to enter the currency code as we configured in the CDS view;

- Add ‘AUD’ for Australian Dollar and hit ‘OK’. Check the output ?

- Now lets see how we can consume this CDS view with parameters in our ABAP program. What new code we need to write and how the parameters behave;
Create a new ABAP program ZCONSUME_CDS_PARAM and add code as below
*&---------------------------------------------------------------------*
*& Report zconsume_cds_param
*&---------------------------------------------------------------------*
*&
*&---------------------------------------------------------------------*
REPORT zconsume_cds_param.

data: lv_curr type S_CURRCODE.
cl_demo_input=>new(  )->add_field( changing field  = lv_curr )->request(  ).

select * from ZCDS_VIEW_PARAM( in_curr = @lv_curr ) into table @data(lt_tab).

cl_demo_output=>display( lt_tab ).
The ‘Enter’ button here is automatic, we don’t need to write any code for this. Enter the currency value and hit Enter;

To summarize, in live projects 95% of analytics needs selection screens to get user input. This is also very important to reduce the amount of data hit by the CDS view which subsequently improves the CDS view performance to fetch only the required data out. In this blog post, we saw how to use the parameters to get the user input and fetch only the data needed for analytics.
Part#7. How to search for SAP standard CDS Views
SAP has delivered standard CDS views to create S4 Real Time Analytics and this is also called S4 or S4HANA Embedded Analytics. For attention of BW consultant, it is kind of similar to SAP standard BW content which is delivered by SAP for each module and can be leveraged to create complex analytics. As we can enhance the standard BW content to meet specific business needs, in similar manner SAP standard CDS views can also be enhanced or consumed to meet business requirements. Now the question is ‘How I can find this standard SAP content of delivered out of the box CDS views?’ ‘How would I know a CDS view is already delivered by SAP which has all the required fields OR there are couple of views which together have all the required fields to create this analytics for business and there is no need to create any CDS view from scratch’? So there are 2 best ways of looking for the SAP standard content, let’s look at them;
- The best and preferred way is SAP Help portal. Follow this;
- Go to: https://help.sap.com/viewer/product/SAP_S4HANA_ON-PREMISE/1909.000/en-US
- Open Product Assistance information;

- Follow this path;

- Under CDS Views, you can find information of all the SAP standard CDS views categorized in separate function modules OR Business Functions with all the related information of that view;

- Check out any one;

2. Another way which I also rely on is the ‘Query Browser’ app on ‘Fiori Launchpad’. Login to the Fiori launchpad to find the app. If you can not see this app, make sure you have this role assigned to your user: SAP_BR_EMPLOYEE. Search for ‘Query Browser’;

You must see this page on the ‘Query Browser’ app and this is the place to look for standard CDS views for different SAP functional modules.

in summary, we must not re-invent the wheel. It is very important to know about standard SAP delivered CDS view content and re-utilize it. So whatever business module you are working on, with the help of this blog post, you can find out the standard delivered content and utilize the views already developed by SAP. This drastically reduce the development effort and and business users will be happy to get the analytical reports faster than they expect.
Part#8. CDS Views – Joins and Associations
In the previous blog posts, you could see that the CDS views are an enhancement of SQL and at real time projects, we need to join multiple table together to convert data into a meaningful information. Let’ see how it works with CDS views.
JOINS: We can use below different type of Joins within CDS view;
- Inner Join
- Left Outer join
- Right outer join
I will not talk about all the joins, they behave exactly similar way as in simple SQL concepts. Let’s see an example of Inner Join code for syntax purose;
- Create a new CDS view with ‘JOIN’ template


Add the necessary components to complete the view. Join tables SFLIGHT and SPFLI. Add airport information from table SPFLI.

- Activate and execute the view to see the data;

We saw that how a CDS view fetched data from 2 tables with the help of a Join. Now let’s think about why are we creating these CDS views? What is the purpose?
CDS view are not directly accessed by the business users rather they will be consumed by either ABAP program, Fiori apps or BI front end tools. If you have created a CDS view with JOINS on 5 different tables then this JOIN conditions will be executed every time this CDS view is triggered. Even though the business user is looking at only fields from 2 tables but the CDS view will first run the Join conditions of all 5 tables and it doesn’t matter how many fields user is looking at. This is the SQL concept with Joins but results in delayed performance to fetch the data out of CDS view in case of user looking at just the partial data. To overcome this problem, SAP did an enhancement to this SQL way of getting data and beautifully developed the concept of ‘ASSOCIATIONS’. With Associations, data will be fetched only when user want to see it. Let’s see how it works;
ASSOCIATIONS:
ASSOCIATIONS are kind of Joins to fetch data from multiple tables on Join Conditions but these are ‘JOINS ON-DEMAND’ i.e. they will only be triggered when user would access the required data which needs the Association of tables. For example, your CDS view has 4 Associations configured and user is fetching data for only 2 tables, the ASSOICATION on other 2 tables will not be triggered and the system would return the results quickly, so it enables really high turn-around time as compared to regular SQL JOINS.
Associations are defined with ‘Cardinality’. Syntax : association[<cardinality>]
Cardinality concept is not new and holds the same concept with CDS views as well. There are 4 types of Cardinality possible based on the data and relationship in the tables joined;
- 0..1
- 0..n or 0..*
- 1..0
- 1..n or 1..*
NOTE: If you are confused on what kind of association I should configure in my CDS view then you can apply a rule of thumb: ‘always use this : association[1]. This will always trigger an OUTER join and will work in all the cases.
Let’s create a CDS view with ASSOCIATION concept.
- Create View with Association template;


- Below is the default structure you will get. As you can see the association cardinality is defined as ‘Association[1]’. You can keep it as it is, if you are not sure what association you have to assign.
- Check the default Association name as _association_name. This can be any name of your choice but SAP has created a naming convention standard to start this name with an underscore(_) and it is always good to follow SAP standard best practices.

- Add the required data elements to complete the view. Lets take the same example we did with JOIN view.
-EXPOSED Association

Right click and select ‘Show SQL CREATE Statement;

As you can see, NO Join is created;

- We can add separate fields in the CDS view as well like a join and that is called Ad-Hoc Association Concept. In this scenario a join will be performed beforehand.
-AD-HOC Association:

Check the SQL CREATE statement. Note that a ‘LEFT OUTER MANY TO ONE JOIN’ is created. The join created because we selected individual fields instead of exposing the whole Association and it is LEFT OUTER MANY TO ONE i.e. *..1 due to the fact that we configured cardinality like ASSOCIATION[1].

As we saw above the ASSOCIATION concept with EXPOSED and AD-HOC Associations. Now lets activate the view with Exposed Association and see how it performs a join at RUN Time.
Activate this view and hit F8 to execute;

Execute and look at highlighted – CDS View name and CARRID data AA and AZ. Also note that NO data from table SPFLI is displayed as NO join is yet performed.

Now if you want to see further Airport information for CARRID ‘AA’ from table SPFLI. right click on any row with CARRID ‘AA’ and choose ‘Follow Association’. Another pop-up window will opn, click the Association type;

Check data: Join is now performed ON-DEMAND and data only for CARRID ‘AA’ is displayed based on Association Key.

In summary, Association concept is one of the wonderful things I liked about CDS views. So intelligently, SAP developed this to save the effort in reading only the information which is required for the analytics purpose. You can feel the real difference after designing a very complex CDS view with a combination of multiple table and other CDS views. The very complex CDS view still performance great when Associations are used. In this blog post, we saw the Association concept together with Exposed and Ad-Hoc associations.
Part#9. CDS View – OData Service : Publishing to the outer world
PUBLISHING CDS View to the Outer World over internet with OData Service and consume via FIORI app.
It is very easy to publish a CDS view with OData Service. To do it we just have to use one annotation ‘@OData.publish: true’ which will further create an OData Service and we must register it within SAP system via GUI interface. Once registered, CDS view is ready to be consumed in any application within or outside SAP environment. We will look at how we can consume it in a simple Master-Details CDS view app.
Let’s create a new view with tables ‘VBAK – Sales Header’ and VBAP – Sales Items’. We will use the concept of ‘Association’ again.

Create the CDS view as below and activate. You can choose any tables of your choice.

- Now add the OData annotation and activate again

- Hover over the mouse pointer on the yellow icon showed up in front of @OData annotation. It will show the service name which gets created and indicates that service is not yet active. Copy the service name to register and activate. This is a mandatory one-time activity we need to perform so that our CDS view can be published with OData. Notice that the service name generated by the system is almost like your CDS view name with _CDS

- Login to SAP GUI interface to register the service. You can hot CTRL+6 to login within ADT or login separately via SAP Logon pad.
- Goto tcode /n/IWFND/MAINT_SERVICE and clock ‘Add Service’ button.

- Choose ‘LOCAL’ as System Alias and pass the service name we copied from CDS view to ‘External Service Name’. Hit Enter. Select the Service and click ‘Add Selected Services’.

- Now pass the ‘package’ to transport OR select ‘Local’ if no transport is required. Hit ‘Continue’;

- Service is now created.

->To check if Service is registered, Go back screen and filter it.


->Select the Service and click on Call Browser;

->A browser window will open and you have to enter your SAP credentials( uname/pwd ). You can see the service code. Note the CDS View/Entity name and the Asslciation Table name ‘VBAP’ also appears.
-> To check if OData service returns the data, copy the CDS view name and add it to the link in the browser.
FROM:

TO:

Note that the data displayed is only from table VBAK – Sales Header. NO Join is yet performed and NO data from table VBAP – Sales Item is displayed yet. Check the highlighted link in blue, this is the link to the table VBAP to display data On-Demand as we have applied the concept of ‘ASSOCIATIONS’ within the CDS view. Copy and paste this link in the browser window by replacing it with the CDS view name as below;
-Replace <IP address> with you IP in below URLs
To:
Check that the data from Sales Item table VBAP is now displayed;

- CDS view and OData Service is now ready and next we will plug this in to a FIORI app and we need to do a little configuration via SAP Web IDE. SAP Web IDE personal edition is free from SAP, you can download from here: https://tools.hana.ondemand.com/#sapui5 and unzip the file on your machine. It will create an eclipse folder.

- Launch SAP Web IDE;
- Go to eclipse folder and double click ‘Orion.exe’ file to start the Web IDE server.
- Once started, go to web browser and launch : http://localhost:8080/webide/index.html
- Right click on Workspace->New->Project from Template
- Click on ‘SAP Fiori Master-Detail Application and hit ‘Next’

- Enter necessary information and hit ‘Next’;

- Choose your S/4 system and system might ask uname/pwd if you are logging in first time. Check that all the OData services are displayed.

NOTE: If your S4 system is not available as you can see above, you have to configure the destination file if you have not done yet. Follow these steps;
- Go to this path in your SAP Web IDE folder;
C:\SAP Web IDE\eclipse\config_master\service.destinations\destinations
- Maintain the system file with below config;
Name=S4D
Type=HTTP
Description=S4D – AWS1809
URL=http://<IP address>:8080
ProxyType=Internet
Authentication=NoAuthentication
WebIDEUsage=odata_abap,odata_gen,ui5_execute_abap,dev_abap
WebIDESystem=S4D
WebIDEEnabled=true
TrustAll=true
sap-client=600

- Next to URL: you can either use IP or the system name. Make sure the port is correct too, it could be different in your system.
- Make sure this file has no extension. You can check like this:

If you see any extension, delete it and save. So after selecting the S/4 system, you can select the CDS View OData service form the list and take it from here to create Fiori App.
The CDS view now is available to feed the data to the Fiori App. We will see another end to end example in a separate blog post to plug CDS into FIORI app.

In summary, FIORI is the new web way of working with SAP systems via ‘apps’. All the Operational or Analytical reports will be configured into FIORI screens as apps, to be triggered with a click. In this blog post, we saw what all we need to integrate a CDS view into FIORI framework and how to resolve issues during integration.
Part#10. CDS Views – @VDM Annotation
Before we start developing any CDS view, it is highly important to understand the purpose of it. Why it is being created? Who and where this CDS view is going to be consumed – Is it for Analytics tools? Is it for FIORI app? Is it just to be consumed by other CDS views? Once we understand all these elements, it would help to standardize the view development and that’s when we can define the specific Annotations within the view. We must apply the annotations which make sense to the CDS view. Though adding annotations which are not required may not impact anything but would surely make it confusing when other developers or project support team will deal with those views.
At a glance below type of Annotations are used while configuring CDS views;
-@OData, @UI – Used for FIORI applications.
-@Analytics – Used to consume CDS view into Analytical tools like Bex, Lumira, Webi, Analysis for Office.
-@ObjectModel – Used for Transactional applications using BOPF
-@Semantics – Used for S4HANA Embedded Analytics
You can find detailed information on all type of Annotations here; https://help.sap.com/viewer/cc0c305d2fab47bd808adcad3ca7ee9d/7.5.9/en-US/630ce9b386b84e80bfade96779fbaeec.html
@VDM:
To standardize the CDS view technical development, SAP came up with the Best Practices with @VDM annotation. This is to standardize the development process and if religiously followed in the organization, it will very easy to maintain these technical artifacts with no issues and confusions. Looking at this annotations, one can figure out everything about the CDS view. This annotation has absolutely NO impact on the behavior or output of the CDS view rather it just show below features;
- What kind of data the CDS view expose.
- What is the category of the CDS view.
@VDM annotation is further broken down into the type of views. There are 4 type of CDS views can be developed;
-BASIC
Basic CDS views are developed to expose the Master Data like Customer Master, Material MAster, Business Partner etc. They consume the physical SAP tables to read data. They are also called INTERFACE views and for naming standards SAP use ‘I’ in between of the view name : *_I_*
-COMPOSITE:
These views are configures as an Association of Master data sets OR Master data and Transactional data. They can consume Basic Views or other Composite views to read data. For naming standards, SAP use ‘CO’ in between of the view name: *_CO_*
-CONSUMPTION
These views are created as the last layer of CDS analytical Model. These are the final views ready for consumption by the UI tools – Bex, Lumira, Webi, Analysis for Office etc. to be accessed by business users in the from of a report. These views can consume all other Basic or Composite Views to read data and create a final data set to be fed into the UI tools for reports based on business requirements. For naming standards, SAP start the view name with ‘C’: C_*
-PRIVATE
These views are private to SAP and must not be Used or Created by anyone other than SAP. SAP can change their configuration without any notice to the customers. For naming standards, SAP start the view name with ‘P’: P_*
NOTE: When you look at the SAP standard views, now with above naming standards how easy it is to identify the purpose and behavior of each of the view. You can easily know in which bucket the view fall into and how you can use it in your data model.
We can not use VDM annotations with Non S4HANA systems. This needs HANA DB as a pre-requisite.
With @VDM annotation, if you apply all the standard procedures in the CDS view creation, It will be fairly easy for other developers who will see you code to understand the nature and purpose of the CDS view you have created. This is one of the very important annotation for Quality Control and must be forced in an organization to achieve the Best Development Practices/Standards.
- Let’s create a VDM based CDS view to showcase how this looks;
- Create a new view with ASSOCIATION template.
- Copy the code from our previous Association view to save time.

3. Add the VDM and Analytics annotations;

@VDM:{viewType: #BASIC} :
This annotation defines the type of the CDS view. As mentioned above the type BASIC view are mostly used for Master Data and denotes that it is a BASIC Interface CDS view.
@Analytics:{dataExtraction:{enabled: true}, dataCategory: #DIMENSION}
This annotation defines if this CDS view is consumable by the Analytical applications. For attention of BW folks, we can create a custom datasource out of a CDS view by using this annotation. I will explain this in detail later. This annotations tells that we can extract data out of ECC system to BW for example and the Data Category ‘DIMENSION’ defines that it is a Dimension data which could be a Master data set and later this can be combined with the Fact Table or CDS view type #CUBE.
Activate and execute this CDS view. There will be no difference you can see in the output with or without VDM or Analytics annotations. While we will configure BW Data Source from a CDS view then it will be very helpful.
In summary, before starting to develop any CDS view, we must understand the whole life cycle of the data this view is going to deliver. It is a must to understand who is the consumer of this data coming out of this CDS view and then use the required annotations accordingly. Follow best SAP development practices and make the code look clean, easy to understand and best in performance.
Part#11.End to End Data Modeling and Reporting with CDS views
Let’s create a very simple data model on SAP’s demo data with FLIGHT module, just to showcase how an end to end business scenarios might look like. To create any analytics data model we need DIMENSION Data which are the Master Data sets and FACT data which is a Transaction Data Set. Below are the related tables, 3 Dimension/Master tables and 1 Fact table.
Dimension Tables:
- SCUSTOM for Customer information.
- SCARR for Airline information
- SPFLI for Connection information.
Fact Table:
- SBOOK : Flight Bookings information
NOTE: For Time Dimension we can use SAP standard Basic Interface view I_CalendarDate and for Country and Country text we can use I_Country.
- Create the first view for Airline information : ZCDS_VIEW_AIRLN
CDS View:

Note these annotations;
@VDM:{viewType: #BASIC} : As already mentioned, this annotation tells that this is a Basic Interface view which delivers Master Data – Airline Information in this scenario.
@Semantics.currencyCode: true – This annotation tells system that field ‘currcode’ is treated as Currency field.
@Analytics: dataCategory: #DIMENSION – shows this is Dimension data.
Output:

2. Create second view for Connection information: ZCDS_VIEW_CONN

Note: Check the keyword $Projection. Instead of source table name or alias, we can use $Projection as well which will take care of Association. The thing to note is with $Project, you can only use the fields which you have listed in the CDS view i.e. if the table has 20 fields but in your CDS view you want only 5 fields and you have listed them in the view, you can use only one of these 5 fields with $Projection. You are free to use table name or alias, this is just what SAP is using for standard views and comes under best practices.
Output: check the output and association;


3. Create a view for Customer information : ZCDS_VIEW_CUST

Output: check the Association jump to Country and Country Text via standard view I_Country.


4. Create a COMPOSITE view to combine all the Dimension views created above with Transaction or Fact data.
@AbapCatalog.sqlViewName: 'ZSQL_VIEW_FLBOOK'
@AbapCatalog.compiler.compareFilter: true
@AbapCatalog.preserveKey: true
@AccessControl.authorizationCheck: #CHECK
@EndUserText.label: 'Flight Booking Information'

@VDM : {viewType: #COMPOSITE}
@Analytics: {dataCategory: #CUBE, dataExtraction: {enabled: true}}
define view ZCDS_VIEW_FLBOOK as select from sbook
association [1] to I_CalendarDate    as _CalendarDate on  $projection.FlightDate       = _CalendarDate.CalendarDate
association [1] to ZCDS_VIEW_AIRLINE as _Airline      on  $projection.Airline          = _Airline.Airline
association [1] to zcds_view_conn    as _Connection   on  $projection.Airline          = _Connection.Airline
                                                      and $projection.FlightConnection = _Connection.FlConnectNumber
association [1] to ZCDS_VIEW_CUST    as _Customer     on  $projection.Customer         = _Customer.Customer

{

    /** DIMENSIONS **/

  key carrid                 as Airline,
  key connid                 as FlightConnection,
  key fldate                 as FlightDate,
  key bookid                 as BookNumber,
  key customid               as Customer,
  key agencynum              as TravelAgency,

  _CalendarDate.CalendarYear,

  _CalendarDate.CalendarMonth,

  _Customer.country      as CustomerCountry,

  _Customer.city         as CustomerCity,


  /** MEASURES **/
  @EndUserText.label: 'Booking Price'
  @DefaultAggregation: #SUM
  @Semantics.amount.currencyCode: 'Currency'
  forcuram               as BookingPrice,

  @EndUserText.label: 'Currency'
  @Semantics.currencyCode: true
  forcurkey              as Currency,

  @EndUserText.label: 'Luggage Weight'
  @DefaultAggregation: #SUM
  @Semantics.quantity.unitOfMeasure: 'WeightUOM'
  luggweight             as WeightOfLuggage,

  @EndUserText.label: 'Weight Unit'
  @Semantics.unitOfMeasure: true
  wunit                  as WeightUOM,


  // Associations
  _Airline,
  _CalendarDate,
  _CalendarDate._CalendarMonth,
  _CalendarDate._CalendarYear,
  _Connection,
  _Customer,

  _Customer._Country     as _CustomerCountry
}
Look at the few annotations used above;
@VDM : {viewType: #COMPOSITE}
This annotation describes that this is a COMPOSITE view which is an association of Master data and Transaction data. This is an SAP Best Practice to configure this annotation to follow the development standards.
@Analytics: dataCategory: #CUBE
In the above CDS view the dataCategory annotation is set to #CUBE which would define this CDS view as a data Cube. All other Dimension table are associated with this cube to built the final Reports. On thing to note is once a CDS view is created as #CUBE, no Dimension view can consume it. Only views which can consume a Cube view should be of type cube themselves. Only CDS view of type CUBE can be consumed in S/4HANA Analytics layer. It is mandatory to define at least one measures in the CDS view of type CUBE, else the view will not get activated and throw an error.
@DefaultAggregation: #SUM
This annotation is very important in the design of a CUBE like structure which we would see shortly. The system will be able to know these are actually Key Figures only when we use this annotation. As a result system will put them into the right bucket ‘Key Figures’ in the cube.
@EndUserText.label: ‘Weight of Luggage’
This annotation can be used to give a required business labels to the fields instead of using standard table field names.
The above view is like a CUBE where combined Dimension data with Fact data. Now we need a final view which will be ready for the consumption by UI tools and finally by business users in the from of Reports/Dashboards. This view will be like a Query on top of the previous CUBE view.
Let’s create the final view as below;
@AbapCatalog.sqlViewName: 'ZSQL_VIEW_FRPRT'
@AbapCatalog.compiler.compareFilter: true
@AbapCatalog.preserveKey: true
@AccessControl.authorizationCheck: #CHECK
@EndUserText.label: 'Flight Details Report'
@OData.publish: true

@VDM: {viewType: #CONSUMPTION}
@Analytics.query: true
define view ZCDS_VIEW_FREPORT as select from ZCDS_VIEW_FLBOOK

{
    //ZCDS_VIEW_FLBOOK

    key Airline,
    key FlightConnection,
    key FlightDate,
    key BookNumber,
    key Customer,
    --key TravelAgency,

    CalendarYear,
    CalendarMonth,
    CustomerCountry,
    CustomerCity,
    WeightOfLuggage,
    WeightUOM,
    BookingPrice,
    Currency,
    /* Associations */
    //ZCDS_VIEW_FLBOOK
    _Airline,
    _CalendarDate,
    _CalendarMonth,
    _CalendarYear,
    _Connection,
    _Customer,
    _CustomerCountry
}
Note the below annotations;
@VDM: {viewType: #CONSUMPTION}
This annotation describes that this view is the final view ready to Consumed. No Joins or Associations are performed here and this is made to behave like a query via below annotation.
@Analytics.query: true
This annotation actually SET this view to be consumption ready by different UI tools.It is mandatory to use this annotation if our intend is to create final analytical reports on this view via SAP front end tools – Bex, Webi, Lumira, SAC – SAP Analytics Cloud etc.
CONSUMING CDS VIEW INTO SAP UI TOOLS:
Now we will see how to consume the final View which also has a VDM ViewType CONSUMPTION means it is ready to be consumed.
- There are 2 tools in SAP S4HANA where this view can be consumed.
- RSRTS_ODP_DIS
- RSRT
RSRTS_ODP_DIS:
This tcode display the structure of the Cube we created with CDS views. If you remember, we created a CDS view of VDM type CUBE : ZCDS_VIEW_FLBOOK and the DDIC SQL view name is : ZSQL_VIEW_FLBOOK.
->Run T-code RSRTS_ODP_DIS
-Choose ODP Context as ‘ABAP Core Data Services
-For ODP Name, enter the DDIC SQL View name followed by ‘2C’
-Execute

What you will see now is a ‘Transient Provider’ system created. Note the structure, it is exactly like a BW cube. If you are a BW consultant, you can relate well. If not, just look at the nodes ‘KEY’, ‘DATA’, ‘UNIT’, and ‘KEY FIGURE’ and the fields underneath. This happens due to the different annotations we used while creating the CDS view, especially datacategory: #CUBE. If you don’t put this annotation, this will NOT work at all.


-Click on button ‘Standard Query’

-Now you can actually place data elements into rows and columns like a report.

-Since it is kind of a virtual cube now, you can also pull it into Bex Query Designer to create a Bex Query which can be configured with more advanced features and can be consumed into SAP Front end tools like Lumira, Webi, Analysis for MS Excel.
-> Open Bex Query Designer;
-Hit ‘Create’ and search for the view 2CZSQL_VIEW_FLBOOK and open

Now within Bex designer, you can create a regular report with all the advanced Bex features like Rows, Columns, Restricted/Calculated Key figures, Cell definitions, Exceptions, Conditions etc. and can be consumed into all Analytics tools like Webi, Lumira, Analysis for Office etc.

RSRT:
For simple CDS view with few Mathematical expression which we have already configured in the CDS view itself, we need not to really configure them into Bex Query designer for user consumption, rather we can directly have business users to access those via t-code RSRT. To enable the business user to access a CDS view as type of an analytical report, we need to create the final view which is ready for user consumption. This view will read the COMPOSITE view we created above. This view needs to be created of type CONSUMPTION and we need to add another annotation which will make this view as a query: @Analytics.query: true
Note the annotations :
@VDM: {viewType: #CONSUMPTION}
@Analytics.query: true
@AbapCatalog.sqlViewName: 'ZSQL_VIEW_FRPRT'
@AbapCatalog.compiler.compareFilter: true
@AbapCatalog.preserveKey: true
@AccessControl.authorizationCheck: #CHECK
@EndUserText.label: 'Flight Details Report'

@VDM: {viewType: #CONSUMPTION}
@Analytics.query: true
define view ZCDS_VIEW_FREPORT as select from ZCDS_VIEW_FLBOOK

{
    //ZCDS_VIEW_FLBOOK

    key Airline,
    key FlightConnection,
    key FlightDate,
    key BookNumber,
    key Customer,
    --key TravelAgency,


    CalendarYear,
    CalendarMonth,
    CustomerCountry,
    CustomerCity,
    WeightOfLuggage,
    WeightUOM,
    BookingPrice,
    Currency,
    /* Associations */
    //ZCDS_VIEW_FLBOOK
    _Airline,
    _CalendarDate,
    _CalendarMonth,
    _CalendarYear,
    _Connection,
    _Customer,
    _CustomerCountry
}
Now run T-code: RSRT and enter the name of the view followed by 2C and hit ‘Execute’


You can see the Key Figures already added as columns. Business users can now add Rows based on the analytics requirement they have.

In case a business user would want to have a default view with some Rows/Columns already added into the report when he/she execute it via RSRT. That can also be enabled via another annotations. Lets try that as well;
Check the annotation: @AnalyticsDetails.query.axis: #ROWS
You have different options here like Bex Designer;

Look at the whole code with ROWS and COLUMNS config.
@AbapCatalog.sqlViewName: 'ZSQL_VIEW_FRPRT'
@AbapCatalog.compiler.compareFilter: true
@AbapCatalog.preserveKey: true
@AccessControl.authorizationCheck: #CHECK
@EndUserText.label: 'Flight Details Report'

@VDM: {viewType: #CONSUMPTION}
@Analytics.query: true
define view ZCDS_VIEW_FREPORT as select from ZCDS_VIEW_FLBOOK

{
    //ZCDS_VIEW_FLBOOK

    key Airline,
    key FlightConnection,
    key FlightDate,
    key BookNumber,
    key Customer,
    --key TravelAgency,

    @AnalyticsDetails.query.axis: #ROWS
    CalendarYear,
    @AnalyticsDetails.query.axis: #ROWS
    CalendarMonth,
    @AnalyticsDetails.query.axis: #ROWS
    CustomerCountry,
    @AnalyticsDetails.query.axis: #ROWS
    CustomerCity,
    @AnalyticsDetails.query.axis: #COLUMNS
    WeightOfLuggage,
    WeightUOM,
    @AnalyticsDetails.query.axis: #COLUMNS
    BookingPrice,
    Currency,
    /* Associations */
    //ZCDS_VIEW_FLBOOK
    _Airline,
    _CalendarDate,
    _CalendarMonth,
    _CalendarYear,
    _Connection,
    _Customer,
    _CustomerCountry
}
Now check this query again in RSRT, see how awesome it is ?.. check the default rows & columns added.

Now if you are an ABAP expert, you might be thinking how to add a Selection Screen to this report and if you are a BW guy, you might be thinking how to add ‘Characteristic Restriction’ to filter the data. This is absolutely possible in a CDS view with use of one another annotation: @Consumption.filter.selectionType: There are different options to choose from, see below. Let’s add a selection parameter for Country with a ‘Single Selection’

Try running this query again with tcode: RSRT. Check the selection box shows up on the top. Enter US and execute.


Parameter as Mandatory Selection:
If you want to make the parameter as a mandatory selection; you can add another clause in the annotation :

Now if you try to run without passing any value, you can see an error message;

—All above we saw how to consume CDS view into SAP Analytics tools. Now we will see how to consume the same view into FIORI—
CONSUME CDS VIEW INTO ANALYSIS FOR OFFICE:
As I mentioned, a CDS view can be consumed into Analysis for Office to enable ad-hoc analysis by the business users. Let’s look how we can do it;
- Open Analysis for office and connect to the S4HANA system;
- Search for the CDS view of VDM type ‘COMPOSITE’ and dataCategory ‘CUBE’ we created above;

Data is ready now to do ad-hoc analysis;

CONSUME CDS VIEW INTO FIORI APPLICATION:
As we already saw in one of the previous blog that to consume a CDS view we need an OData service. So let’s first configure an OData service in the CDS view.
- Configure OData Service – This can be done by adding an annotation. Activate the view;

2. Copy the service name by hovering over mouse pointer on the yellow icon that show up after adding OData annotation;

3. Register the Service.
Goto code /n/IWFND/MAINT_SERVICE, click on ‘Add Service’ button;

4. Choose System Alias – ‘LOCAL’ and the external Service name which we just created by
OData. Hit Enter.

5. Select the service and hit ‘Add Selected Service’ button to register the service. This is only One Time Activity.

6. Choose LOCAL for Package Selection and execute;


7. Service is registered.
8. Start Web IDE to create a FIORI app on top of the CDS
9. New-Project from Template;

10. Choose ‘List Report Application’;

11. Add the required details and click ‘Next;

12. Connect to Server;

13. Choose the registered service name;

14. Select all the annotations;

15. For Data Binding, select the CDS view name and hit ‘Finish’

16. Now execute the FIORI application;


17. You can see a FIORI tile created;

18. Double click on FIORI tile and enter your credentials;

19. Enter ‘US’ in the mandatory parameter for Country Selection and hot ‘Go’. Since we did not yet selected columns to be displayed, we will see this message;

20. Click on ‘Setting’ button to add columns;

21. Look at the wonderful report generated. This is the new reporting methodology followed in S4 environment. There are many great features as well.

22. Users can enable more filters by themselves, I like this feature too much. No code required. Click on Adapt Filter->More Filters. Select the ones you need;

23. Check these filters are now available to filter out data;

In summary, we looked at the complete end to end cycle of an analytics requirements. In your projects, you would find a similar development but can be very complex based on what business users would want to see as the final reports.
ABAP CDS View on HANA – Learn how to create them
ABAP CDS view is used to define semantic data models on the standard database tables or dictionary views. A CDS view is defined with the statement DEFINE VIEW. In this ABAP on HANA tutorial, you will learn how to create ABAP CDS View on HANA. The abbreviation for CDS is Core Data Services. To know about ABAP CDS click here.
Prerequisites
- You have installed Eclipse IDE( Kepler/Juno version )on your local machine. Click here to know more about it.
- You have installed ABAP Development Tools in Eclipse IDE.
- You have access to ABAP Netweaver 7.4 on HANA.
- You have created ABAP Project in eclipse to connect to ABAP Netweaver 7.4 system. Click here to know how to create ABAP Project.
Step-by-Step Procedure
1. Choose the package in which you want to create CDS Views. Right-click on the package → New → Other ABAP Repository Object.

2. In the New ABAP Repository Object window, search for DDL source object by typing in search field.Select the DDL Source and hit Next.

3. In the New DDL Source window, enter Name and Description of the CDS View and hit Finish.

4. A new CDS view editor opens up like below.

5. Here we are going to retrieve the data from the table SNWD_PD using ABAP CDS View.Look at the DDL source we need to replace few values
- Replace data_source_name with table name “SNWD_PD” from which you want to get the data.
- Provide new value for @AbapCatalog.sqlViewName as “ZV_DEMO_01” .
6. Now the DDL source looks like below.

7. Lets look at the syntax for the CDS View.
Syntax
@AbapCatalog.sqlViewName: ‘CDS_DB_VIEW’
[@view_annot1]
[@view_annot2] …
[DEFINE] VIEW cds_entity [name_list] [parameter_list] AS select_statement [;]
In the first part of the syntax we declare annotations.
Annotation “@AbapCatalog.sqlViewName” is mandatory when creating CDS views, by which it creates a view in the Data Dictionary.
- cds_entity – is the name of the view.
- name_list – list of field names displayed in the output when we run the CDS view.
- parameter_list – list of input parameters to the CDS view.
- select_statement – is the select statement to be provided from table.
Full syntax documentation is available here.
8. Lets get back to our CDS view, here we are retrieving PRODUCT_ID, TYPE_CODE and CATEGORY from the table SNWD_PD. All the table fields will be entered inside the curly braces { } in DDL source editor like below. Now the code look like below.
@AbapCatalog.sqlViewName: 'ZV_DEMO_01'
@ClientDependent: true
@AbapCatalog.compiler.CompareFilter: true
@EndUserText.label: 'Demo'
define view Zcds_Demo_Example1 as select from snwd_pd
{
    product_id,
    type_code,
    category
}
To access all field from the table.
@AbapCatalog.sqlViewName: 'ZV_DEMO_01'
@ClientDependent: true
@AbapCatalog.compiler.CompareFilter: true
@EndUserText.label: 'Demo'
define view Zcds_Demo_Example1 as select from snwd_pd
{ * }
9. Do a syntax check by clicking on the syntax button ![]() in the toolbar and active the DDL Source.
in the toolbar and active the DDL Source.
10. Now a new ABAP DDL Source object will be created and available under the ABAP DDL Sources folder and also new dictionary view will be created along with it under the Views folder.

11. Right click on the newly created DDL source object and choose Open Data Preview to view the data.

12. You will see the output like below with data retrieving from the CDS view.

You have successfully created an ABAP CDS View on HANA. In our next tutorial we will know how to use these ABAP CDS view in ABAP programs/reports and also will have deep dive into full features of ABAP CDS views.
How to call ABAP CDS Views in ABAP report on S/4 HANA
The abbreviation for CDS is Core Data Services.To know about ABAP CDS click here.
Prerequisites
- You have installed Eclipse IDE( Kepler/Juno version )on your local machine.
- You have installed ABAP Development Tools in Eclipse IDE.
- You have access to ABAP Netweaver 7.4 on HANA.
- You have created ABAP Project in eclipse to connect to ABAP Netweaver 7.4 system.Click here to know how to create ABAP Project.
- You have already created ABAP CDS View.
Step-by-Step Procedure
1. Create an ABAP program/report.

2. In the New ABAP Program window, enter Name and Description and hit Next.

3. In the Selection of Transport Request window, choose the transport request. As we are saving the program in $TMP package in our case no transport request is required.Click on Finish.

4. To call an ABAP CDS view you can use Open SQL statements to get the data.Sample ABAP code snippet to call a CDS will look like below.
Syntax: SELECT * FROM <cds_view_name>.
SELECT * FROM ZCDS_DEMO_EXAMPLE1
         INTO TABLE @DATA(lt_data).
But in this demo example we will use the CDS View to create an ABAP ALV report.Copy and paste the below code in the ABAP program.
************************************************
*  OPEN SQL statement to access the CDS View   *
************************************************
SELECT * FROM ZCDS_DEMO_EXAMPLE1 INTO TABLE @DATA(lt_data).

************************************************
*       CDS View in ABAP ALV Report            *
************************************************
DATA: lo_alv TYPE REF TO if_salv_gui_table_ida.

cl_salv_gui_table_ida=>create(
  EXPORTING
    iv_table_name         = 'ZV_DEMO_01'    "Name of CDS View name
  RECEIVING
    ro_alv_gui_table_ida  =  lo_alv
).
*  CATCH cx_salv_db_connection.    "
*  CATCH cx_salv_db_table_not_supported.    "
*  CATCH cx_salv_ida_contract_violation.    "

* Display ALV
lo_alv->FULLSCREEN( )->display( )
5. Lets look at the code, we have used CDS view name created in our previous tutorial to the ALV with IDA class CL_SALV_GUI_TABLE_IDA as a data source to the ALV. Save and activate the ABAP program.
6. Execute the ABAP report and you should see the ALV output like below.

You successfully learned how to call ABAP CDS Views in ABAP report on HANA.
How to use JOINS in ABAP CDS Views on HANA
The abbreviation for CDS is Core Data Services.To know more about ABAP CDS Views click here.
As an ABAP developer, we all know about JOINS and how to use them in our ABAP program which are running on traditional databases.
But our hands are tied up and we are refrained to use these JOINS due to performance issues in traditional databases. As an when SAP introduced HANA database no more restrictions in using them and we are free to use as many as JOINS on different tables. Thanks to SAP HANA.
In this tutorials we will see different types of JOINS available and we will learn how to use JOINS in ABAP CDS Views on HANA.
So lets have a look on how to use JOINS in ABAP CDS Views on HANA.
In this demo example we are using EPM tables SNWD_SO(EPM: Sales Order Header Table), SNWD_SO_I(EPM: Sales Order Item Table) and SNWD_PD(EPM: Product Data Table).
Step-by-Step Procedure
1. Choose the package in which you want to create CDS Views.Right click on the package → New → Other ABAP Repository Object.
2. In the New ABAP Repository Object window, search for DDL source object by typing in search field.Select the DDL Source and hit Next.
3. In the New DDL Source window, enter Name and Description of the CDS View and hit Finish.
4. A new CDS view editor opens up like below.
Different Types of JOINS
1. INNER JOIN or just JOIN
Selects all entries which exists in both tables which meet ON condition.
Below is the sample ABAP CDS views in which INNER JOIN is used among 3 tables to get the so_id, so_item_pos, product_id, amount and currency_code. Copy and paste the below code into DDL source
@AbapCatalog.sqlViewName: 'ZV_DEMO_01'
@ClientDependent: true
@AbapCatalog.compiler.CompareFilter: true
@EndUserText.label: 'Demo'
define view Zcds_Demo_Example1 as
select from snwd_so
       join snwd_so_i on snwd_so.node_key = snwd_so_i.parent_key
       inner join snwd_pd on snwd_so_i.product_guid = snwd_pd.node_key
{
    snwd_so.so_id,
    snwd_so_i.so_item_pos,
    snwd_pd.product_id,
    snwd_so_i.net_amount,
    snwd_so_i.currency_code
}
2. LEFT OUTER JOIN
Selects all records from the left table matching with the right table which meet ON condition. If no record found in second table those record fields are null.
@AbapCatalog.sqlViewName: 'Z_CDS_OUTJOIN'
@AbapCatalog.compiler.compareFilter: true
@AccessControl.authorizationCheck: #CHECK
@EndUserText.label: 'Joins in ABAP CDS Views'
define view Z_Cds_Joins as select from snwd_so
       left outer join snwd_so_i on snwd_so.node_key = snwd_so_i.parent_key
{
    snwd_so.so_id,
    snwd_so.billing_status,
    snwd_so.delivery_status,
    snwd_so.op_id,
    snwd_so_i.so_item_pos,
    snwd_so_i.net_amount,
    snwd_so_i.currency_code
}
3. RIGHT OUTER JOIN
Selects all records from the right table matching with the left table which meet ON condition. If no record found in left table those record fields are null.
@AbapCatalog.sqlViewName: 'Z_CDS_OUTJOIN'
@AbapCatalog.compiler.compareFilter: true
@AccessControl.authorizationCheck: #CHECK
@EndUserText.label: 'Joins in ABAP CDS Views'
define view Z_Cds_Joins as select from snwd_so
        right outer join snwd_so_i
        on snwd_so.node_key = snwd_so_i.parent_key
{
    snwd_so.so_id,
    snwd_so.billing_status,
    snwd_so.delivery_status,
    snwd_so.op_id,
    snwd_so_i.so_item_pos,
    snwd_so_i.net_amount,
    snwd_so_i.currency_code
}
You have successfully learned how to use INNER JOIN in ABAP CDS Views on HANA. In the same way you can use left Outer Join and Right Outer Join.
How to create ABAP CDS Views with Parameters
In this ABAP for HANA tutorial, you will learn How to create ABAP CDS Views with parameters in ABAP for HANA. Input parameters are used to restrict the data from CDS Views. Please click here to access all tutorials related to ABAP CDS Views. Lets get started.
Prerequisites
- You have access to minimum ABAP Netweaver 7.4 system.
- You have installed Eclipse IDE( Kepler/Juno version ) on your local machine.Click here to know more about.
- You have installed ABAP Development Tools in Eclipse IDE.
- You have created ABAP Project in eclipse to connect to ABAP Netweaver 7.4 system.Click here to know how to create ABAP Project.
- You have basic understanding of ABAP CDS Views.
Step-by-Step Procedure
1. Choose the package in which you want to create ABAP CDS Views. Right-click on the package → New → Other ABAP Repository Object.
2. In the New ABAP Repository Object window, search for DDL source object by typing in search field.Select the DDL Source and hit Next.
3. In the New DDL Source window, enter Name and Description of the CDS View and hit Finish.
4. A new ABAP CDS view editor opens up like below and paste the below code.
@AbapCatalog.sqlViewName: 'Z_CDS_PARAMS'
@AbapCatalog.compiler.compareFilter: true
@AccessControl.authorizationCheck: #CHECK
@EndUserText.label: 'CDS View with Parameters'

define view Z_Cds_With_Params
       with parameters p_billing_status  :SNWD_SO_CF_STATUS_CODE,
                       p_delivery_status :SNWD_SO_OR_STATUS_CODE
       as select from snwd_so
       join snwd_so_i on snwd_so.node_key = snwd_so_i.parent_key{
            snwd_so.so_id             as orderno,
            snwd_so_i.so_item_pos     as itemno,
            snwd_so_i.currency_code   as currency,
            snwd_so_i.gross_amount    as grossamount,
            snwd_so_i.net_amount      as netamount,
            snwd_so_i.tax_amount      as taxamount

        } where snwd_so.billing_status  = :p_billing_status and
                snwd_so.delivery_status = $parameters.p_delivery_status;
5. Lets observe the code
Line 8-9: We can provide the parameters to the ABAP CDS Views by adding the syntax WITH PARAMETERS p1, p2… Data Dictionary ABAP data types can be used while defining the parameters to the ABAP CDS Views.
Line 19-20: We can use the parameters p1, p2.. in CDS Views using the syntax :p1 or $parameters:p1
6. Now we will see how to call the ABAP CDS views with input parameters in an ABAP program using Open SQL statement. Create an ABAP program in eclipse ADT or SE38 transaction. Below is the code snippet to call the ABAP CDS Views with input parameters.
*-----------------------------------------------------------------*
* Use Open SQL statement to get the data from the ABAP CDS views  *
* with Input Parameters                                           *
*-----------------------------------------------------------------*
SELECT orderno,
       itemno,
       currency,
       grossamount,
       netamount,
       bill_status
       FROM z_cds_params( p_billing_status  = 'P',
                          p_delivery_status = 'D' )
       INTO TABLE @DATA(lt_result).

* Display
 cl_demo_output=>display( lt_result ).
Input parameters can be used in different places in the SELECT of the ABAP CDS view. Below are ABAP CDS views examples in different forms.
1Parameters used in SELECT list
In the below CDS view parameter “p_billing_status” is used in the SELECT list
@AbapCatalog.sqlViewName: 'z_cds_params'
@AbapCatalog.compiler.compareFilter: true
@AccessControl.authorizationCheck: #CHECK
@EndUserText.label: 'cds view with parameters'

define view z_cds_with_params
       with parameters p_billing_status  :snwd_so_cf_status_code,
                       p_delivery_status :snwd_so_or_status_code
       as select from snwd_so
       join snwd_so_i on snwd_so.node_key = snwd_so_i.parent_key{
            snwd_so.so_id             as orderno,
            snwd_so_i.so_item_pos     as itemno,
            snwd_so_i.currency_code   as currency,
            snwd_so_i.gross_amount    as grossamount,
            snwd_so_i.net_amount      as netamount,
            snwd_so_i.tax_amount      as taxamount,

            //Parameters used in SELECT list
            :p_billing_status         as billing_status

        } where snwd_so.billing_status  = :p_billing_status and
                snwd_so.delivery_status = $parameters.p_delivery_status;
2Parameters used in Arithmetic Expressions
In below CDS view code parameter “p_discount_percentage” is used in the arithmetic expressions to calculate the discount amount.
@AbapCatalog.sqlViewName: 'z_cds_params'
@AbapCatalog.compiler.compareFilter: true
@AccessControl.authorizationCheck: #CHECK
@EndUserText.label: 'cds view with parameters'

define view z_cds_with_params
       with parameters p_billing_status      :snwd_so_cf_status_code,
                       p_discount_percentage :int4
       as select from snwd_so
       join snwd_so_i on snwd_so.node_key = snwd_so_i.parent_key{
            snwd_so.so_id             as orderno,
            snwd_so_i.so_item_pos     as itemno,
            snwd_so_i.currency_code   as currency,
            snwd_so_i.gross_amount    as grossamount,
            snwd_so_i.net_amount      as netamount,

            // Parameter used in Arthimetic expressions
            (snwd_so_i.net_amount * :p_discount_percentage) as discount_amt

        } where snwd_so.billing_status  = :p_billing_status;
3Parameters used in CASE statement
In the below CDS view code the input parameter “p_billing_status” is used in CASE distinction.
@AbapCatalog.sqlViewName: 'z_cds_params'
@AbapCatalog.compiler.compareFilter: true
@AccessControl.authorizationCheck: #CHECK
@EndUserText.label: 'cds view with parameters'

define view z_cds_with_params
       with parameters p_billing_status      :snwd_so_cf_status_code
       as select from snwd_so
       join snwd_so_i on snwd_so.node_key = snwd_so_i.parent_key{
            snwd_so.so_id             as orderno,
            snwd_so_i.so_item_pos     as itemno,
            snwd_so_i.currency_code   as currency,
            snwd_so_i.gross_amount    as grossamount,
            snwd_so_i.net_amount      as netamount,

            // Parameter used in CASE distinction
            case :p_billing_status
                when 'P' then 'Paid'
                else 'Un Paid'
            end                       as bill_status

        } where snwd_so.billing_status  = :p_billing_status;
Aggregate Expressions in ABAP CDS Views
To access all ABAP CDS Views tutorials click here. Lets get started.
Prerequisites
- You have installed Eclipse IDE( Mars Version )on your local machine.Click here to know more about.
- You have installed ABAP Development Tools in Eclipse IDE.
- You have access to minimum ABAP Netweaver 7.4 on HANA.
- You have created ABAP Project in eclipse to connect to ABAP Netweaver 7.4 system.Click here to know how to create ABAP Project.
Below is the list of aggregation expressions used in ABAP CDS views.
1. SUM
@AbapCatalog.sqlViewName: 'ZCDS_AGGR'
@AbapCatalog.compiler.compareFilter: true
@AccessControl.authorizationCheck: #CHECK
@EndUserText.label: 'Aggregations'

define view Z_Cds_Agg_sum as select from snwd_stock
    join snwd_pd on snwd_stock.product_guid = snwd_pd.node_key
    {
    key snwd_pd.product_id,
    snwd_pd.category,
    // Aggregate function "SUM"
    sum(snwd_stock.quantity) as total_stock
    }
    group by snwd_pd.category,
             snwd_pd.product_id
In the above example ABAP CDS view selects the total stock of the product by using the aggregate function SUM and GROUP BY product and category.
2. MAX
@AbapCatalog.sqlViewName: 'ZCDS_AGGR'
@AbapCatalog.compiler.compareFilter: true
@AccessControl.authorizationCheck: #CHECK
@EndUserText.label: 'Aggregations'
define view Z_Cds_Agg_max as select from snwd_so
          join snwd_bpa on snwd_so.buyer_guid = snwd_bpa.node_key
          {
           key  snwd_bpa.bp_id,
                snwd_bpa.company_name,
           // Aggregate function "MAX"
           max(snwd_so.gross_amount) as max_sales_amt
} group by snwd_bpa.bp_id,
           snwd_bpa.company_name
In the above example ABAP CDS view selects the maximum sales amount generated by the customer by using the aggregate function MAX and GROUP BY business partner.
3. MIN
@AbapCatalog.sqlViewName: 'ZCDS_AGGR'
@AbapCatalog.compiler.compareFilter: true
@AccessControl.authorizationCheck: #CHECK
@EndUserText.label: 'Aggregations'
define view Z_Cds_Agg_min as select from snwd_so
          join snwd_bpa on snwd_so.buyer_guid = snwd_bpa.node_key
          {
           key  snwd_bpa.bp_id,
                snwd_bpa.company_name,
           // Aggregate function "MIN"
           min(snwd_so.gross_amount) as min_sales_amt
} group by snwd_bpa.bp_id,
           snwd_bpa.company_name
In the above example ABAP CDS view selects the minimum sales amount generated by the customer by using the aggregate function MIN and GROUP BY business partner.
4. COUNT( * )
@AbapCatalog.sqlViewName: 'ZCDS_AGGR2'
@AbapCatalog.compiler.compareFilter: true
@AccessControl.authorizationCheck: #CHECK
@EndUserText.label: 'Aggregations'
define view Z_Cds_Agg as select from snwd_so
          join snwd_bpa on snwd_so.buyer_guid = snwd_bpa.node_key
          {
           key  snwd_bpa.bp_id,
                snwd_bpa.company_name,
           // Aggregate expression COUNT( * )
           count(*) as min_sales_amt
} group by snwd_bpa.bp_id,
           snwd_bpa.company_name
In the above example ABAP CDS view selects the total number of sales order created against the business partner by using the aggregate function COUNT( * ) and GROUP BY business partner.
5. COUNT( DISTINCT )
@AbapCatalog.sqlViewName: 'ZCDS_AGGR_4'
@AbapCatalog.compiler.compareFilter: true
@AccessControl.authorizationCheck: #CHECK
@EndUserText.label: 'Aggregate Expressions'
define view Zcds_Agg_C as select from snwd_so_i
       join snwd_pd on snwd_so_i.product_guid = snwd_pd.node_key
     {
        key snwd_pd.product_id,
        // Aggregate Expression - COUNT( DISTINCT )
        count( distinct snwd_so_i.node_key) as orders_count
} group by snwd_pd.product_id
In the above example ABAP CDS view selects the total number of sales order created against the product by using the aggregate function COUNT( DISTINCT ) and GROUP BY product id.
Points to be remembered
- Every aggregate expressions used need an alternative element name defined using AS.
- Aggregate expressions should require GROUP BY clause.
- All non-aggregated fields used in CDS view should be specified in the GROUP BY clause.
Congrats! You have successfully learned different Aggregate Expressions in ABAP CDS Views.
How to use String Functions in ABAP CDS Views
Prerequisites
- You have installed Eclipse IDE( Mars Version )on your local machine.Click here to know more about.
- You have installed ABAP Development Tools in Eclipse IDE.
- You have access to minimum ABAP Netweaver 7.4 on HANA.
- You have created ABAP Project in eclipse to connect to ABAP Netweaver 7.4 system.Click here to know how to create ABAP Project.
String Functions in ABAP CDS Views
Below is the list of frequently used string functions in ABAP CDS views.
1CONCAT(arg1, arg2)
CONCAT(arg1, agr2) string function can be used to concatenate two character strings.
@AbapCatalog.sqlViewName: 'ZCDS_STR_FUN'
@AbapCatalog.compiler.compareFilter: true
@AccessControl.authorizationCheck: #CHECK
@EndUserText.label: 'String Functions'
define view Zcds_Sql_Func as select from kna1 {

    // CONCATENATE name1 & name2
    CONCAT( kna1.name1, kna1.name2 ) as full_name
}2CONCAT_WITH_SPACE(arg1, arg2, spaces)
This string function is used to concatenate two character strings with space. The number of blanks between the arguments arg1 and arg2 is specified in spaces.
@AbapCatalog.sqlViewName: 'ZCDS_STR_FUN'
@AbapCatalog.compiler.compareFilter: true
@AccessControl.authorizationCheck: #CHECK
@EndUserText.label: 'String Functions'
define view Zcds_Sql_Func as select from kna1 {

    // CONCATENATE name1 & name2 with 4 space
    CONCAT_WITH_SPACE( kna1.name1, kna1.name2, 4 ) as full_name
}3SUBSTRING(arg, pos, len)
To get sub string of arg from the position pos in the lenght len.
@AbapCatalog.sqlViewName: 'ZCDS_STR_FUN'
@AbapCatalog.compiler.compareFilter: true
@AccessControl.authorizationCheck: #CHECK
@EndUserText.label: 'String Functions'
define view Zcds_Sql_Func as select from kna1 {

    // To get substring for a given string
    SUBSTRING( kna1.name1, 2, 10) as name
}4LENGTH(arg)
It returns the no of characters in the string which is passed as a argument arg. It ignores trailing blanks.
@AbapCatalog.sqlViewName: 'ZCDS_STR_FUN'
@AbapCatalog.compiler.compareFilter: true
@AccessControl.authorizationCheck: #CHECK
@EndUserText.label: 'String Functions'
define view Zcds_Sql_Func as select from kna1 {

    // To get length for a given string
    LENGTH( kna1.name1 ) as name_length
}
5LEFT(arg, len) & RIGHT(arg, len)
LEFT(arg, len) – It returns the left-side part of the string which is passed as argument arg of length len.
RIGHT(arg, len) – It returns the right-side part of the string which is passed as argument arg of length len.
Note: Trailing blanks are ignored
@AbapCatalog.sqlViewName: 'ZCDS_STR_FUN'
@AbapCatalog.compiler.compareFilter: true
@AccessControl.authorizationCheck: #CHECK
@EndUserText.label: 'String Functions'
define view Zcds_Sql_Func as select from kna1 {

    // To get length for a given string
    LEFT( kna1.name1, 3) as name_left,
    RIGHT( kna1.name1, 3) as name_right,
    kna1.name1
}6LTRIM(arg, char) & RTRIM(arg, char)
LTRIM(arg, char) – It removes the trailing blanks and leading character which matches the parameter char.
RTRIM(arg, char) – It removes the trailing blanks and trailing character which matches the parameter char.
@AbapCatalog.sqlViewName: 'ZCDS_STR_FUN'
@AbapCatalog.compiler.compareFilter: true
@AccessControl.authorizationCheck: #CHECK
@EndUserText.label: 'String Functions'
define view Zcds_Sql_Func as select from kna1 {

    // Removes the trailing blanks and character
    LTRIM( kna1.name1, 'L') as name_lt,
    RTRIM( kna1.name1, 'T') as name_rt
}
Congrats! You have successfully learned String Functions in ABAP CDS Views.Please stay tuned for more ABAP CDS view tutorials.
Date Functions in ABAP CDS Views
Prerequisites
- You have installed ABAP Development Tools in Eclipse IDE.
- You have access to minimum ABAP Netweaver 7.5 on HANA.
- You have created ABAP Project in eclipse to connect to ABAP Netweaver 7.4 system. Click here to know how to create ABAP Project.
Note: Date and Time Functions are introduced in ABAP 7.50
Below are the list of Date and Time Functions in ABAP CDS views.
1. DATE_IS_VALID(date)
The date function DATE_IS_VALID is used to validate the date contains the valid SAP date format “YYYYMMDD“.
It returns “1” if the date is in valid date format else “0“. If the date is blank it returns “0“.
@AbapCatalog.sqlViewName: 'ZCDS_DATE'
@AbapCatalog.compiler.compareFilter: true
@AccessControl.authorizationCheck: #CHECK
@EndUserText.label: 'Date Functions'
define view zcds_date_functions
            with parameters p_from_date:abap.dats
            as select from snwd_so
 {
  snwd_so.buyer_guid,
  snwd_so.billing_status,

  // returns 1 - Valid Date
  // returns 0 - Invalid Date
  DATS_IS_VALID(:p_from_date) as from_date
}
2. DATS_DAYS_BETWEEN(date1, date2)
This function DATS_DAYS_BETWEEN calculates the no of days between the two specified dates, date1 and date2.
@AbapCatalog.sqlViewName: 'ZCDS_DATE'
@AbapCatalog.compiler.compareFilter: true
@AccessControl.authorizationCheck: #CHECK
@EndUserText.label: 'Date Functions'
define view zcds_date_functions
            as select from vbak
 {
  vbak.vbeln,  //Sales Document
  vbak.auart,  //Sales Document Type
  vbak.audat,  //Document Date
  vbak.vdatu,  //Requested delivery date

  DATS_DAYS_BETWEEN(audat, vdatu) as no_of_days
}
3. DATS_ADD_DAYS(date, days, on_error)
DATS_ADD_DAYS adds days to the specified date date.
- days should be of type INT4, both negative and positive value for days is allowed.
@AbapCatalog.sqlViewName: 'ZCDS_DATE'
@AbapCatalog.compiler.compareFilter: true
@AccessControl.authorizationCheck: #CHECK
@EndUserText.label: 'Date Functions'
define view zcds_date_functions
            as select from vbak
 {
  vbak.vbeln,  //Sales Document
  vbak.auart,  //Sales Document Type
  vbak.audat,  //Document Date
  vbak.vdatu,  //Requested delivery date

  DATS_ADD_DAYS(vdatu, 10, 'NULL')     as option2,  //add 10 days
  DATS_ADD_DAYS(vdatu, -10, 'NULL')    as option1,  //substract 10 days
  DATS_ADD_DAYS(vdatu, 5, 'FAIL')      as option3,
  DATS_ADD_DAYS(vdatu, 4, 'INITIAL')   as option4,
  DATS_ADD_DAYS(vdatu, 2, 'UNCHANGED') as option5
}
4. DATS_ADD_MONTHS(date, months, on_error)
The date function DATS_ADD_MONTHS add months to the specified date.
@AbapCatalog.sqlViewName: 'ZCDS_DATE'
@AbapCatalog.compiler.compareFilter: true
@AccessControl.authorizationCheck: #CHECK
@EndUserText.label: 'Date Functions'
define view zcds_date_functions
            as select from vbak
 {
  vbak.vbeln,  //Sales Document
  vbak.auart,  //Sales Document Type
  vbak.audat,  //Document Date
  vbak.vdatu,  //Requested delivery date

  DATS_ADD_MONTHS(vdatu, 10, 'NULL')     as option1,  //add 10 months
  DATS_ADD_MONTHS(vdatu, -10, 'NULL')    as option2,  //substract 10 months
  DATS_ADD_MONTHS(vdatu, 5, 'FAIL')      as option3,
  DATS_ADD_MONTHS(vdatu, 4, 'INITIAL')   as option4,
  DATS_ADD_MONTHS(vdatu, 2, 'UNCHANGED') as option5
}
Congrats! You have successfully learned how to use Date Functions in ABAP CDS Views. Please stay tuned for ABAP CDS Views tutorials.
How to create OData service for ABAP CDS Views using Annotation
We usually create OData services in SAP Gateway system using transaction SAP Gateway Service Builder(SEGW).
ABAP CDS View OData Annotation
With introduction of ABAP CDS views in SAP Business Suite 4(S/4 HANA), several thousands of CDS views are created for efficient and faster data access.
A new and easy way of creating OData services based on CDS views was introduced using the annotation @OData.publish: true at view level.
Lets see how we can expose the ABAP CDS View as OData Service using an example and below is the exposure process.
Step-by-Step Procedure
Example #1 – ABAP CDS View with out Parameters
1. Create an ABAP CDS view using ABAP Development Tools in Eclipse. Copy and paste the below code in DDL editor.
@AbapCatalog.sqlViewName: 'ZV_ODATA_DEMO'
@AbapCatalog.compiler.compareFilter: true
@AccessControl.authorizationCheck: #NOT_REQUIRED
@EndUserText.label: 'OData service on ABAP CDS View'


define view ZODATA_DEMO as select from scarr
{
key carrid      as AirlineCode,
    carrname    as AirlineName,
    currcode    as Currency,
    url         as AirlineURL
}
2. Add the annotation @OData.publish: true above the DEFINE VIEW statement.
3. After adding the annotation to CDS View save and activate the view.
@AbapCatalog.sqlViewName: 'ZV_ODATA_DEMO'
@AbapCatalog.compiler.compareFilter: true
@AccessControl.authorizationCheck: #NOT_REQUIRED
@EndUserText.label: 'OData service on ABAP CDS View'

@OData.publish: true
define view ZODATA_DEMO as select from scarr
{
key carrid      as AirlineCode,
    carrname    as AirlineName,
    currcode    as Currency,
    url         as AirlineURL
}
CDS view should meet following rules for successful OData service generation.
- No syntax errors in DDL source code.
- At least one key element is defined in the SELECT list of the CDS view.
- The name of the CDS view should not exceed 26 characters in length.
4. After activating the CDS view, following Gateway artifacts will be generated by the SADL framework in back-end server.
- Technical service name artifact – <cds_view_name>_CDS.
- Gateway Model artifact with name – <cds_view_name>_CDS.
- ABAP class with name – CL_<cds_view_name>.
You can find all these artifacts in the transaction code – “/IWBEP/REG_SERVICE”.
 5. Launch the transaction code “/IWFND/MAINT_SERVICE” to activate the OData service in hub system. Enter System Alias, Technical Service Name and click the Get Services button. The service will be displayed for selection.
 6. In the Add Service dialog box enter the package name. Technical service name and Technical model name will already be suggested. Click on OK to continue.
 7. A dialog box appears as shown below, click on OK to continue.
 8. As a result OData service is activated successfully in the Gateway hub system. Launch the transaction code “/IWFND/GW_CLIENT” to test the service.
 Above is the metadata generated for the OData service created based on the ABAP CDS view. Lets closely look at the metadata and identify the different artifacts as part of the OData service.
- Entity Type – ZODATA_DEMOType
- Entity Set – ZODATA_DEMO
Now lets see the data by accessing the entity set
http://<server>:8001/sap/opu/odata/sap/ZODATA_DEMO_CDS/ZODATA_DEMO
Example #2 – ABAP CDS View with Parameters
1. Below is the code for ABAP CDS view with parameters
@AbapCatalog.sqlViewName: 'ZV_ODATA_DEMO_P'
@AbapCatalog.compiler.compareFilter: true
@AccessControl.authorizationCheck: #NOT_REQUIRED
@EndUserText.label: 'OData service on ABAP CDS View'

@OData.publish: true
define view ZODATA_DEMO_PARAMS
with parameters p_carrid :S_CARR_ID
as select from scarr

{
key carrid      as AirlineCode,
    carrname    as AirlineName,
    currcode    as Currency,
    url         as AirlineURL
}
where carrid = $parameters.p_carrid
NOTE: As of now there is no annotation/a way to make the input parameters OPTIONAL in ABAP CDS Views. So you have to pass values for all input parameters in ABAP CDS view while accessing the data from it.
2. Repeat the steps explained above in the Example #1 to create the OData service for this CDS view also.
3. On successfully OData service generation, execute the OData service and look at the metadata generated and following are the 2 entity sets generated
 ZODATA_DEMO_PARAMSSet – Entity set which has 2 key predicates, one is the input parameter and the second one is the key of ABAP CDS View. You need to pass these 2 key predicates while accessing the data
ZODATA_DEMO_PARAMS – Entity set which has 1 key predicate, which is input parameter. You need to pass this key predicate to access the data.
To access the data you can use both entity sets and lets look how we can form the URI for both of them.
If you like to use entity set ZODATA_DEMO_PARAMSSet following the URI to be used /sap/opu/odata/sap/ZODATA_DEMO_PARAMS_CDS/ZODATA_DEMO_PARAMSSet(p_carrid=’AA’,AirlineCode=’AA’)
 If you like to use entity set ZODATA_DEMO_PARAMS following the URI to be used /sap/opu/odata/sap/ZODATA_DEMO_PARAMS_CDS/ZODATA_DEMO_PARAMS(p_carrid=’AA’)/Set
 Congrats!! You have successfully created an OData service for an ABAP CDS view. Please stay tuned for more tutorials.
How to create Associations in ABAP CDS Views
If you are an experienced ABAP developer and have basic knowledge on ABAP CDS view you may jump directly to the step-by-step guide.
For beginners you may have to start with prerequisites section and come back to this blog post to further gain knowledge on ABAP CDS views. Lets get started
Prerequisites
- Install ABAP Development Tools in Eclipse.
- Create your first ABAP CDS View.
- and some other ABAP CDS Views knowledge gainer blog.
Step-by-step Procedure
Before starting our development lets understand about the background of associations and its usability.
What is an CDS View Association?
Association is a relationship between two CDS views. We will understand this definition by looking at an example.
Lets say we have 2 CDS views, one CDS View1 which will retrieve the order header information and a second CDS View2 which will retrieve the order line item information.
CDS View Association is nothing but, establishing the relationship between these 2 CDS views on a common field/expression to get the order header and its line item information.
Lets start our development to understand even better
1. Create a CDS View to get the sales order header information from the database table(VBAK). Below is the sample DDL code snippet for the same.
@AbapCatalog.sqlViewName: 'ZV_ORD_HDR'
@AbapCatalog.compiler.compareFilter: true
@AccessControl.authorizationCheck: #NOT_REQUIRED
@EndUserText.label: 'Order Header Information'
define view ZCDS_SALESORDER_HDR
as select from vbak
{
  vbeln,
  erdat,
  vbtyp,
  auart,
  vkorg,
  vtweg,
  spart,
  netwr,
  waerk
}
2. Create another CDS view to get the sales order item information from the database table(VBAP). Below is the sample DDL code snippet for the same.
@AbapCatalog.sqlViewName: 'ZV_ORD_ITM'
@AbapCatalog.compiler.compareFilter: true
@AccessControl.authorizationCheck: #NOT_REQUIRED
@EndUserText.label: 'Order Item Information'
define view ZCDS_SALESORDER_ITM
as select from vbap
{
 vbeln,
 posnr,
 matnr,
 zwert,
 zmeng
}
the above CDS view seems to simple select from single table, lets make it complex by adding JOINS to get more details.
@AbapCatalog.sqlViewName: 'ZV_ORD_ITM'
@AbapCatalog.compiler.compareFilter: true
@AccessControl.authorizationCheck: #NOT_REQUIRED
@EndUserText.label: 'Order Item Information'
define view ZCDS_SALESORDER_ITM
as select from vbap
left outer join makt on vbap.matnr = makt.matnr
{
 vbeln,
 posnr,
 vbap.matnr,
 makt.maktx,
 zwert,
 zmeng
}
Association on ABAP CDS Views
Now lets create an associations between these two CDS views. Below is the syntax for creating associations.
@AbapCatalog.sqlViewName: 'ZV_ORD_HDR'
@AbapCatalog.compiler.compareFilter: true
@AccessControl.authorizationCheck: #NOT_REQUIRED
@EndUserText.label: 'Order Header Information'
define view ZCDS_SALESORDER_HDR
as select from vbak
   association to ZCDS_SALESORDER_ITM as _OrderItems
               on vbak.vbeln = _OrderItems.vbeln
{
  key vbeln,
  erdat,
  vbtyp,
  auart,
  vkorg,
  vtweg,
  spart,
  netwr,
  waerk,
  _OrderItems.matnr,
  _OrderItems.maktx
}
Line 7-8: association syntax on another CDS view ZCDS_SALESORDER_ITM based on the VBELN(sales order number) field.
Line 19-20: fields from the association can be accessed in the SELECT list by prefixing them with association name followed by period( . ) _OrderItems.matnr
Association with cardinality
Now lets try to add the cardinality on the target cds view which is defined with association with this syntax [min..max]
@AbapCatalog.sqlViewName: 'ZV_ORD_HDR'
@AbapCatalog.compiler.compareFilter: true
@AccessControl.authorizationCheck: #NOT_REQUIRED
@EndUserText.label: 'Order Header Information'
define view ZCDS_SALESORDER_HDR
as select from vbak
   association [1..*] to ZCDS_SALESORDER_ITM as _OrderItems
               on vbak.vbeln = _OrderItems.vbeln
{
  key vbeln,
  erdat,
  vbtyp,
  auart,
  vkorg,
  vtweg,
  spart,
  netwr,
  waerk,
  _OrderItems.matnr,
  _OrderItems.maktx
}
Below are the rules for min and max values.
- max cannot be 0.
- An asterisk * for max means any number of rows.
- min can be omitted (set to 0 if omitted).
- min cannot be *.
- When an association is used in a WHERE condition, 1 must be specified for max.
Association ON condition rules
When specifying the ON condition with association, following rules are applied.
- The fields specified in the ON condition should be included in the SELECT list. In our example, the field VBELN is specified in ON condition and SELECT list.
- The fields of source data source can be prefixed with $projection instead of data source name.
define view ZCDS_SALESORDER_HDR as select from vbak association [1..*] to ZCDS_SALESORDER_ITM as _OrderItems on $projection.vbeln = _OrderItems.vbeln { ..... } - the fields of target data source should be prefixed with association name. _OrderItems.vbeln
Data Preview
Right click on the DDL editor

Output data of the ABAP cds view will be displayed like below

Choose any one record and right click on it and choose Follow Association

List of associations will be displayed in a window like below, choose the relevant association

Double click on the association to see the data

Association as join type
The association defined in an ABAP CDS view will be converted to join type at run-time. By default the join type is LEFT OUTER JOIN.
The below CDS view will result in LEFT OUTER JOIN when executed.
@AbapCatalog.sqlViewName: 'ZV_ORD_HDR'
@AbapCatalog.compiler.compareFilter: true
@AccessControl.authorizationCheck: #NOT_REQUIRED
@EndUserText.label: 'Order Header Information'
define view ZCDS_SALESORDER_HDR
as select from vbak
   association [1..*] to ZCDS_SALESORDER_ITM as _OrderItems
               on $projection.vbeln = _OrderItems.vbeln
{
  key vbeln,
      erdat,
      vbtyp,
      auart,
      netwr,
      waerk,

     _OrderItems.matnr
}
To achieve INNER JOIN, you need to define the attribute in the path expression like below.
@AbapCatalog.sqlViewName: 'ZV_ORD_HDR'
@AbapCatalog.compiler.compareFilter: true
@AccessControl.authorizationCheck: #NOT_REQUIRED
@EndUserText.label: 'Order Header Information'
define view ZCDS_SALESORDER_HDR
as select from vbak
   association [1..*] to ZCDS_SALESORDER_ITM as _OrderItems
               on $projection.vbeln = _OrderItems.vbeln
{
  key vbeln,
      erdat,
      vbtyp,
      auart,
      netwr,
      waerk,

     _OrderItems[inner].matnr
}
Usage of CDS view with association in ABAP using OpenSQL
We can access the CDS view which has associations defined in ABAP program using Open SQL statement using the path expressions like below
DATA(is_supported) = cl_abap_dbfeatures=>use_features(
 requested_features = VALUE #( ( cl_abap_dbfeatures=>views_with_parameters ) ) ).
IF is_supported IS NOT INITIAL.
  SELECT  *
    FROM zcds_salesorder_hdr
    INTO TABLE @DATA(lt_data).
ENDIF.
Want to learn about new ABAP syntax, click here
DATA(is_supported) = cl_abap_dbfeatures=>use_features(
 requested_features = VALUE #( ( cl_abap_dbfeatures=>views_with_parameters ) ) ).
IF is_supported IS NOT INITIAL.
  SELECT  vbeln,
      erdat,
    \_orderitems-matnr AS material
    FROM zcds_salesorder_hdr
    INTO TABLE @DATA(lt_data).
ENDIF.
Congrats.! You have successfully learned on how to create associations in ABAP CDS views.Please stay tuned to us for more ABAP CDS view tutorials.
How to create OData service for ABAP CDS views using Referenced Data Source in SEGW
Hello everyone, in this blog we will discuss on how to create OData service for ABAP CDS views in SEGW based on Referenced Data Source.
In previous blog How to create OData service for ABAP CDS Views we have seen an easy approach on exposing the ABAP CDS view as an OData service using the annotation @OData.publish: true and also the restrictions/disadvantages by following the approach.
Referenced Data Source
To overcome the above restriction, we can follow this approach. Below are the features supported.
Advantages and Features Supported
- Multiple Entities i.e multiple CDS views
- Associations
- Actions using Function Imports in SEGW
- CDS View with parameters
- CDS annotations considered and derived at runtime
- CDS changes will be reflected at runtime, no need for re-activation
Prerequisites
Basic understating of ABAP CDS views, to know more click here.
Step-by-Step Procedure
1. Creating an New Project
Launch SEGW – Gateway Service Builder transaction on front-end server(FES).
Click on Create Project and provide the necessary details on Create Project dialog box.
A new SEGW project will be created with empty data model like below.
1.2. Reference Data Source
Now right-click on the Data Model choose Reference and then Data Source.
A new Reference Data Source wizard will open like below. Choose ABAP CDS view using the F4 help and hit Next.
In the next wizard step check the information and hit Finish.
ABAP CDS entity will be successfully referenced in the SEGW project and new folder Data Source References will be created under Data Model folder.
Entity types, Entity Sets and Associations will automatically created for the ABAP CDS view.
You can further explore the properties and other artifacts created.
2. Generating Model Provider Class/Data Provider Class and Other Runtime Objects
Navigate and select the project node and hit Generate Runtime Objects button to generate the SEGW OData service run-time artifacts.
On Model and Service Definition dialog box, a list of classes is shown and will be generated. You can go with default name or change them if you like to give different names and hit OK
On the Create Object Directory Entry dialog box, enter a value (e.g. $TMP) to the Package field, and then choose Save.
Now the service classes are generated.
3. Activating Service
Launch the transaction /IWFND/MAINT_SERVICE – Activate and Maintain Services.
Choose Add Service.
On Add Selected Service screen provide the value for System Alias field and then choose Enter. A list of services is then displayed.
From the list of services choose the relevant service, you can search based on your project name. Click on Add Selected Services
On Add Service dialog box specify the package name and choose Enter.
Service is successfully activated with message dialog box like below.
Go back to the Activate and Maintain Services screen and filter with service we just created above. Choose SAP Gateway Client.
4. Test Service in Gateway Client
On SAP Gateway Client, choose Execute to view the metadata of the OData service.
Navigate to EntitySets button from the application toolbar and choose the entity set.
Choose Execute to view the data retrieved from the ABAP CDS view.
Congrats..! You have successfully created an OData service for ABAP CDS view using SEGW based on SADL framework. Please stay tuned for ABAP CDS View Tutorials.
How to create OData Service for ABAP CDS View using Mapping Editor in SEGW
Hello everyone, in this blog post we will learn how to create an OData Service for ABAP CDS Views using Mapping Editor in SEGW(Gateway Builder).
There are 3 different ways to implement an OData service for an ABAP CDS view. Till now we have learnt 2 different approaches, in this blog we will learn the last approach using Mapping Editor in SEGW Gateway Builder. Please find the links below for the first 2 approaches.
- Expose one or more ABAP CDS views to OData service including associations, actions
- Expose one specific ABAP CDS view to OData service using annotation @Odata.publish:true
Lets start the process by creating an ABAP CDS view in Eclipse ADT(ABAP Development Tools). Copy and paste the below DDL source code in the CDS view editor.
@AbapCatalog.sqlViewName: 'ZV_ODATA_DEMO'
@AbapCatalog.compiler.compareFilter: true
@AccessControl.authorizationCheck: #NOT_REQUIRED
@EndUserText.label: 'OData service on ABAP CDS View'

@OData.publish: true
define view ZODATA_DEMO as select from scarr
{
key carrid      as AirlineCode,
    carrname    as AirlineName,
    currcode    as Currency,
    url         as AirlineURL
}
Save and activate the CDS view.
Step-by-Step Procedure
1. Creating a New Project
1.1 Launch SEGW – Gateway Service Builder transaction on front-end server(FES).
1.2 Click on Create Project and provide the necessary details on Create Project dialog box.
1.3 A new SEGW project will be created with empty data model like below.
1.4 Right click on the Entity Types node which is under Data Model to create a new entity type.

1.5 On Create Entity Type dialog box, provide the Entity Type Name, tick Create Relate Entity Set check box to system proposed Entity Set Name. Hit OK button.
Note: To create an entity type you can directly import the DDIC Structure by right clicking on Data Model node → Import → DDIC Structure.

1.6 After creating entity type and its corresponding entity set, now the project will look like this. 2. Mapping Editor

In this step we will map the ABAP CDS view data source to the entity set to retrieve the data
2.1 Expand Service Implementation node → Select and Right click on the entity set name to which you need to map the data source and choose Map to Data Source from the context menu.

2.2 On Map to Data Source dialog box, for Type field choose “Business Entity” and select value-help for Name field.
2.3 On Select Business Entity dialog box, chose the ABAP CDS view name and hit OK button.

2.4 On Mapping Editor screen, hit the button Generate Mapping to automatically map the fields. Instead you can also map the individual fields by drag and drop the fields.

3. Generating Model Provider Class/Data Provider Class and Other Run-time Objects
3.1 Navigate and select the project node and hit Generate Runtime Objects button to generate the SEGW OData service run-time artifacts.
3.2 On Model and Service Definition dialog box, a list of classes is shown and will be generated. You can go with default name or change them if you like to give different names and hit OK.
3.3 On the Create Object Directory Entry dialog box, enter a value (e.g. $TMP) to the Package field, and then choose Save.
3.4 Now the gateway service classes are generated successfully.
4. Activating Service
4.1 Launch the transaction /IWFND/MAINT_SERVICE – Activate and Maintain Services.
4.2 Choose Add Service.
4.3 On Add Selected Service screen provide the value for System Alias field and then choose Enter. A list of services is then displayed.
4.4 From the list of services choose the relevant service, you can search based on your project name. Click on Add Selected Services
4.5 On Add Service dialog box specify the package name and choose Enter.
4.6 Service is successfully activated with message dialog box like below.
4.7 Go back to the Activate and Maintain Services screen and filter with service we just created above. Choose SAP Gateway Client.
5. Test Service in Gateway Client
5.1 On SAP Gateway Client, choose Execute to view the metadata of the OData service.
5.2 Navigate to EntitySets button from the application toolbar and choose the entity set.
5.3 Choose Execute to view the data retrieved from the ABAP CDS view.
Unit and Currency Conversion in ABAP CDS Views
Dear SAP Learners, in the blog you will learn how to perform unit and currency conversion in ABAP CDS Views
In SAP, amounts and measurements are stored in the databases in a source currency and source unit. They need to be converted to make values in different units or currencies.
In traditional ABAP, these currency and unit conversions is done with standard functions provided by SAP. For example
- CONVERT_TO_LOCAL_CURRENCY
- UNIT_CONVERSION_SIMPLE
These standard function modules make use of conversion rules that are maintained in standard transactions and stored in tables.
ABAP CDS Built-in Conversion Functions
Two built-in functions are available to implement conversion in ABAP CDS Views. These are
1. Unit_Conversion(p1 => a1, p2 => a2, …. )
- Returns result of type abap.quan
- Converts a quantity in source unit into a value in target unit
- Rules maintained in transaction CUNI and stores in database table T006 are considered while performing the quantity unit conversions.
Now, lets look at the sample DDL source code.
Database table SPFLI contains a field DISTANCE in which the flight distance is stored for each flight connection and corresponding unit of measure is found in field DISTID.

Different unit of measures exists in the table for different flight connections, lets convert all of them into Miles “MI”.

In the CDS View definition above, the value in table field DISTANCE is converted into miles “MI” and returned as view field DISTANCE.
2. Currency_Conversion(p1 => a1, p2 => a2, ..)
The above conversions function is used to currency conversion in ABAP CDS Views. It
- Returns result of type abap.curr
- Converts an amount in source currency into a value in target currency.
- Based on exchange rate valid on a target date.
- Rules maintained in transaction OB08 and stores in database table TCUR are considered while performing the quantity unit conversions.
In SFLIGHT database table the airfare of all airlines is stored PRICE field and corresponding currency code CURRENCY field.

Lets convert all of them into US Dollar “USD”.

In the CDS View definition above, the value in table field PRICE is converted to US Dollar and returned as view field PRICE.
Error Handling
The above shown built-in conversion functions have extra parameter error_handling can be used in case of any error while performing conversion.
There are 3 possible values for this parameter
- FAIL_ON_ERROR – an error raises an exception, default value.
- SET_TO_NULL – the result is reset to null value.
- KEEP_UNCONVERTED – the source value is not changed.
Lets look a sample DDL source code to handle errors while conversion.

Congratulations!! you have successfully learned how to use unit and currency conversion in ABAP CDS Views.
Understanding View-on-View Concept in ABAP CDS Views
Dear SAPLearners, in this blog post we will learn and understand View-on-View concept in ABAP CDS Views.
We all know that CDS views are based on single database table or on a Join of several database table.
At some times we tend to retrieve all required data by adding many tables with complicated join in a single CDS view. This is not best practice to follow.
To improve re-usability and readability of CDS views, they can be split into different CDS views and use in another CDS views.
View-on-View Concept
In CDS you can define CDS views that are based on one or more CDS views. This is called as “View-on-View” or some times referred as “Nested Views“.
In nested views, a join of CDS views and join of CDS view with database table is supported. There is not technical limitation for nesting depth and complexity of CDS views.
The main advantages by following this approach are
Improve Re-Usability
A common code logic is defined in one basis view that is used in several other CDS views instead of maintaining identical expressions.
Improve Readability
Instead of complicated join of many tables, join of 2 CDS views is more readable.
Dependency Analyzer
The Dependency Analyzer view for CDS view provides you the information about the database tables and other CDS views used in a particular view.
To see the Dependency Analyzer for CDS View right click on CDS View and select Open With and Dependency Analyzer.


Congrats!! you have successfully learned about View-on-View concept in ABAP CDS Views or Nested ABAP CDS Views. Stay tuned for more ABAP CDS View Tutorials
CDS View Browser in S/4 HANA
Dear SAPLearners, in this blog post we will learn about View Browser for ABAP Core Data Services(CDS) views in S/4 HANA.
First of all when it comes to S/4 HANA implementations projects, a common question among developers is – How to find suitable existing standard CDS views available in the system to match the business requirements?
Furthermore, searching for particular CDS views based on field names is also another challenge among S/4 HANA development team.
So finally answer to all your questions is in The View Browser fiori app.
S/4 HANA – View Browser
The View Browser is a tool used to explore ABAP Core Data Services(CDS) views supplied by SAP and custom CDS views created by customers. You can search, browse, tag analytical and non-analytical queries.
The View Browser is fiori app available as tile in SAP Fiori Launchpad.

Using this new View Browser tool you can explore all types of CDS views: Basic, Composite, Consumption and Extension.

The View Browser also shows the total number of CDS views available in the system and also the count of CDS views by different types like shown in the above picture.
In the View Browser it is possible to search for any views using wide variety of methods such as by using CDS view name, by field names or by application name
The View Browser also provide detailed information on definition of the CDS view, the annotations, the associations and cross reference of the selected view.
Definition:
View definition displays the column names, data element and description and other technical attributes of the selected CDS view

Annotation:
Displays a list of annotation name and values.

Cross Reference:
Displays all the CDS views and tables used by the selected view.

You can further navigate to see views or tables by selecting it.

Also Read: Understanding Nested CDS Views in S4 HANA
In the View Browser it is also possible to tag or mark as favorite CDS views, so they can be easily found and quickly locate views.
Like in Query Browser you can also search analytical queries and displays the data preview. The analytical queries are displayed in Design Studio.

You must be assigned the PFCG role Analytics Specialist SAP_BR_ANALYTICS_SPECIALIST in SAP S/4 HANA to be able to access the fiori app.
How to extend standard CDS views
Dear SAPLearners, in the blog post we will learn on how to extend standard CDS Views using Eclipse ABAP Development Tools(ADT).
Given some client/business requirements we may have to extend standard CDS views to add extra fields.
Also Read: How to find all standard and custom CDS views in the system
CDS View Extensions
A CDS view is extended by creating a new DDL source with DDL statement EXTEND VIEW.
As we know for every DDL source we have 2 corresponding dictionary objects created:
- The CDS View and
- SQL View
So when you extend a CDS view, there will be two corresponding objects created:
- The CDS view extension and
- Append View
In this example i will be using standard CDS view “SEPM_SDDL_SALESORDER_HEAD” and add 3 new fields.
Lets see the steps to extend a standard CDS view.
CDS view development and extensions is done using Eclipse ABAP Development Tools(ADT).
 Step-by-Step Procedure
1. Launch the Eclipse ABAP Development Tools.
2. In your ABAP project, select the relevant package in the Project Explorer.
3. Right-click on the package and choose: New – Other ABAP Repository Object – Core Data Services – Data Definition to open the creation wizard.


4. Enter the Name and the Description for the CDS view extension. Choose Next.

5. Assign a transport request, if prompted and choose Next.
6. Select the Extend View template and choose Finish.

7. In DDL source code editor, enter the necessary information for names of the append view, the original CDS view and for the actual view extension like below.

8. In the above CDS view source code, i have extended the view SEPM_SDDL_SALESORDER_HEAD with three new fields: overall_status, payment_terms and payment_method
9. Save and activate the newly created CDS view extension.
10. After successful activation, check the DDL SQL Append View “ZD_EXTENDAPPND” in SE11 transaction.

 Additional fields are added to original CDS view using append view.
11. Now that, we have created CDS view extension lets check the output of the original CDS view using Data Preview

 Key Notes
- A standard CDS view can be extended using multiple CDS view extensions.
- The annotation AbapCatalog.viewEnahancementCategory must be specified in ABAP CDS view with any of these values #PROJECTION_LIST, #GROUP_BY and #UNION.
- A CDS view with AbapCatalog.viewEnahancementCategory as #NONE cannot be extended.
 Conclusion
Congrats!! you have successfully learned how to extend standard CDS view using EXTEND VIEW.
Authorization Check in ABAP CDS View
Dear SAPLearners, in this blog post we will learn about Access control or Authorization checks in CDS view. Before going into the technical details. Lets look at the concepts involved and their meaning.
We all know how authorization works in ABAP, most of the authorization checks are implemented in ABAP using ABAP statement AUTHORITY-CHECK which depends upon the PFCG role assigned to the user.
So, to provide authorization checks in ABAP CDS view a new repository object called Data Control Language (“DCL”) introduced.
Data Control Language (“DCL”)
Data Control Language(DCL) is a language used to define the authorization for the ABAP CDS view which controls access to the data retrieved based on user.
DCL definition is created in DCL editor in eclipse ABAP Development Tool(ADT) using the keyword DEFINE ROLE …
Also Read: How to create DCL source for CDS view
How it works?
DCL source definition defines a CDS role using key work DEFINE ROLE. It contains the syntax to grant data selection from one or more CDS using key word GRANT SELECT ON and have access condition for the CDS view using keyword WHERE.

Lets see a sample DCL syntax
@EndUserText.label: 'Demo: Authorization Check'
@MappingRole: true
define role Zflight_Role_A
   {
    grant
        select
            on Zflight_ACCESS_CONTROL_A
            where carrid<> 'AZ';
}
In the above DCL syntax
- ZFLIGHT_ROLE_A is the role name
- ZFLIGHT_ACCESS_CONTROL_A is CDS view
Lets look at the ZFLIGHT_ACCESS_CONTROL_A CDS view definition below, it retrieves all data records from SPFLI table.
@AbapCatalog.sqlViewName: 'ZAC_A'
@AbapCatalog.compiler.compareFilter: true
@AccessControl.authorizationCheck: #CHECK
@EndUserText.label: 'Access Control B'
define view Zflight_ACCESS_CONTROL_A
as select from spfli
{
*
}
Now that we applied authorization check using DCL: the data preview of CDS view retrieves all data records except CARRID <> ‘AZ’. The database interface will automatically filter the selection results according to the access condition.
Data Preview before:

Data Preview after:

Now, we know that a DCL repository object is used to control data access in CDS view.
Authorization-related Annotations
Lets look what are authorizations related annotations which have to be declared in both CDS DDL source definition and DCL source definition.
Annotations in DCL
- @EndUserText.label:
- The translatable short text for role
- @MappingRole:
- Value true: Role is implicitly to all users
Annotations in DDL
- @AccessControl.authorizationCheck:
- #CHECK: Perform authorization check, Syntax warming if no role is assigned
- #NOT_REQUIRED: Similar to #CHECK but suppress syntax warning
- #NOT_ALLOWED: No authorization check. Syntax warning if role is assigned.
Congrats!! you have successfully learned how to perform authorization check in ABAP CDS view using Data Control Language (“DCL”).
Access Control(DCL) in CDS view
Dear SAPLearners, in this blog post we will learn about access control in CDS view and the steps to create DCL Source.
Access Control in CDS view
DCL stands for Data Control Language. A DCL source allows to restrict the results returned by CDS view according to access conditions.
DCL allows to perform authorization checks for CDS view.
Also Read: How authorization/privileges checks are performed in CDS View
Step-by-Step Procedure
1. Launch ADT in Eclipse.
2. In your ABAP project, select the relevant package node in the Project Explorer. Right click on the package node and then navigate to New >> Other Repository Object.
3. Choose Core Data Services and select DCL Source. Click “Next” button.
4. In New Access Control window, enter the Name and the Description of the DCL source. Click “Next” button.
5. In Templates window, you can choose from the predefined templates. Some of the templates are not yet supported.
6. Choose Finish to create DCL source.
There are three types of access rules that can be specified in DCL source.
- Condition Access Rule
- Full Access Rule
- Inherited Access Rule which inherit the existing CDS role
[1] Condition Access Rules
The condition access rule control the access using access conditions.The access conditions are of two type:
Literal Condition
Compare on field of the CDS view with a literal value.
@EndUserText.label: 'Demo: Authorization Check'
@MappingRole: true
define role Zflight_Role_A
   {
    grant
        select
            on Zflight_ACCESS_CONTROL_A
            where carrid<> 'AZ';
}
PFCG Condition
User one or more fields of the CDS view to look up the user authorizations. PFCG condition is always based on one authorization object.
@EndUserText.label: 'Demo: Authorization Check'
@MappingRole: true
define role Zflight_Role_A
   {
    grant
    select
    on Zflight_ACCESS_CONTROL_A
    where (carrid)      = aspect pfcg_auth ( S_CARRID,
                                             CARRID,
                                             ACTVT = '03' );
}
[2] Full Access Rule
The full access rule grants the unrestricted access. All users can access the CDS view data with out access condition
@EndUserText.label: 'Demo: Authorization Check'
@MappingRole: true
define role Zflight_Role_A
   {
    grant
        select
            on Zflight_ACCESS_CONTROL_A;
}
[3] Inherited Access Rule
The inherited access rule which inherits the existing CDS role access conditions of CDS view that are used as data source in another CDS view.
@EndUserText.label: 'Demo: Authorization Check'
@MappingRole: true
define role Zflight_Role_A
   {
    grant
        select
            on Zflight_ACCESS_CONTROL_A
            inherit Zflight_Role_B;
}
Congrats!! you have successfully learned the steps to create access control in CDS view and DCL source to restrict the data from CDS view.
Session Variable in ABAP CDS view
Dear SAPLearners, in this blog post you will learn about Session Variable in ABAP CDS view.
Session Variables in CDS
Session variables are global variables of the database with predefined value. These predefined values are set when the CDS view is used in Open SQL (or) CDS views that are used as data sources in other CDS views.
There are 4 session variables and each of these corresponds to the ABAP system field.
| Session Variable | ABAP system field |
| $session.client | sy-mandt |
| $session.system_date | sy-datum |
| $session.system_language | sy-langu |
| $session.user | sy-uname |
The variable name is case-sensitive. You can use the session variables in any of these formats $session.vname, $Session.Vname, and $SESSION.VNAME. Here “vname” is the client, system_date, system_language and user.
Session variables are an alternative way to access ABAP environment system fields in ABAP CDS view.
Basic Example #1:
In this example, $session.system_language is used to restrict the join
@AbapCatalog.sqlViewName: 'ZSESS_VAR'
@AbapCatalog.compiler.compareFilter: true
@AbapCatalog.preserveKey: true
@AccessControl.authorizationCheck: #CHECK
@EndUserText.label: 'Session Variable Demo'
define view Z_SESS_VAR_DEMO
    as select from scarr
    left outer join tcurt
                on scarr.currcode = tcurt.waers
                and tcurt.spras = $session.system_language
{
    key scarr.carrid,
        scarr.carrname,
        scarr.currcode,
        scarr.url,
        tcurt.ltext
}
Basic Example #2:
In this example, $session.system_language is used in WHERE condition.
@AbapCatalog.sqlViewName: 'ZSESS_VAR'
@AbapCatalog.compiler.compareFilter: true
@AbapCatalog.preserveKey: true
@AccessControl.authorizationCheck: #CHECK
@EndUserText.label: 'Session Variable Demo'
define view Z_SESS_VAR_DEMO
    as select from makt
{
    key makt.matnr,
        makt.maktx,
        makt.maktg
}
 where makt.spras = $session.system_language
The content of the variables is undefined when Open SQL is not used to access a CDS view with session variables on other databases but in SAP HANA database the content is set independently of ABAP CDS and Open SQL.
Congrats!! you have successfully learned about Session variable in ABAP CDS view.
Virtual Elements in ABAP CDS View
Dear SAPLearners, in this blog post we will learn about Virtual Elements in ABAP CDS View and ABAP Code Exists.
Virtual Elements
Virtual elements are defined at CDS consumption view level by using specific @DataModel annotations. The calculation (or) processing logic of the field value is written in ABAP code.
Implementation of Virtual elements is done using an ABAP class is required and called as ABAP Code Exists API. You can use virtual element for read-only, as well as for transactional scenarios.
Virtual Elements, when to use in ABAP CDS view?
For instance, a business requirement need us to add a field to the CDS view which is calculated using ABAP code. To achieve such kind of requirements we can use virtual elements.
Use Cases
You can use virtual elements to implement following use cases:
- To define calculated field values that are not part of database tables
- Filtering of calculated field values
- Sorting of calculated field values.
Virtual elements in ABAP CDS view, how to implement?
There are two steps in implementing a virtual element in CDS view. They are
- Adding Annotations
- Implementing ABAP Code Exists
1. Add Annotation to CDS view
Following are the annotations that needs to be add to the element of CDS consumption view
- @ObjectModel.readOnly: true
- @ObjectModel.virtualElement: true
- @ObjectModel.virtualElementCalculatedBy: ‘ABAP:<code_exit_class>’
2. Implementing ABAP Code Exists
Create an ABAP code exit class and add the interface IF_SADL_EXIT_CALC_ELEMENT_READ.
Implement interface methods GET_CALCULATION_INFO and CALCULATE in custom code exit class to write the ABAP source code logic.
Demo Time
It’s time to demonstrate virtual elements in the CDS view with sample code.
In this example i am going to use the field “Discount” as a virtual element so that I calculate a discount based on ABAP logic written in code exit class.
Let’s dive into code.
1. Firstly add the virtual elements relevant annotations to CDS view. Here is the sample CDS view code.
@AbapCatalog.sqlViewName: 'ZCDSVIRELE'
@AbapCatalog.compiler.compareFilter: true
@AbapCatalog.preserveKey: true
@AccessControl.authorizationCheck: #CHECK
@EndUserText.label: 'Demo Virtual Elements'

@OData.publish: true

define view ZSL_CDSVIRTUALELEM
  as select from snwd_pd
{

  key node_key   as ProductGuid,
      product_id as ProductId,
      type_code  as CategoryCode,
      category,
      supplier_guid as SupplierGuid,
      tax_tarif_code as TaxTarifCode,
      price as Price,

      @ObjectModel.readOnly: true
      @ObjectModel.virtualElement: true
      @ObjectModel.virtualElementCalculatedBy: 'ABAP:ZCL_DEMO_CODE_EXIT'
      cast( '' as abap.char(4)) as Discount
}
Now moving on to the next step to create ABAP code exit class.
Also Read: Reduce ABAP CDS view development time using Templates.
2. Secondly, create a new ABAP class in SE24 and add the interface IF_SADL_EXIT_CALC_ELEMENT_READ.

3. Navigate to the methods section and implement below methods.
| GET_CALCULATION_INFO | Provides a list of all elements that are required for calculating the values of the virtual elements |
| CALCULATE | Executes the field calculation |

4. Below is the code for method GET_CALCULATION_INFO. Add all fields that are need for calculation.
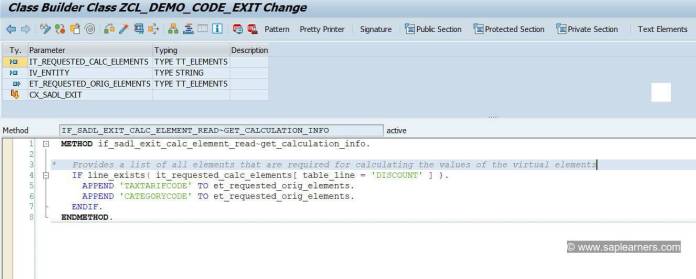
5. As a result fields require for calculation are available for calculation logic. Add the ABAP calculation logic in CALCULATE method.

Finally, it’s time to test the CDS view.
Virtual Elements is triggered only via SADL framework so if you execute the CDS view in Eclipse ADT using Data Preview (or) by calling the CDS view in an ABAP program you will NOT see any output.
The easiest way to test is to expose the CDS view as OData service and execute the service in Gateway Client.
Also Read: How to create OData service for CDS View

Hurray! ABAP code got executed and you can see the values in calculated field.
You can also consume this CDS view based OData service in a custom UI5 application or in a Fiori application based on Fiori Elements and the same result will be seen.
Conclusion
Congrats!! You have successfully learned about virtual elements in ABAP CDS view. A CDS with virtual elements is useful where the data model doesn’t have the required field and needs to be calculated based on the ABAP custom logic.
ABAP CDS View Data Definition Templates
ABAP Core Data Service(CDS) view plays a very important role in S/4 HANA Projects. Developers needs to create ABAP CDS view for different purposes like reporting, SAP Fiori Smart Templates, OData services, BEx queries in Embedded Analytics.
During the ABAP CDS View development, we spent many hours writing same DDL source code.
CDS View Data Definition Templates
Eclipse based ADT provides Data Definition Templates, to address the above problem and reduce the time spent on ABAP CDS view development.
When you create an ABAP CDS view in ADT and follow the Data Definition creation wizard, when you reach the step Templates, where you will find the predefined code templates available for selection.
Also Read: How to create ABAP CDS View.

Eclipse ADT IDE provides 12 predefined ABAP CDS view templates. You can view all data definition templates available in Window -> Preference section.

You can view the preview of Data Definition Template by selecting any of the template.

Okay this is cool!  Can I create additional Data Definition templates for my own use? Yes, we can create, edit and remove templates. Lets see how we can do it.
Create a New Template
1. Under Templates section, click on New.

2. On New Template dialog window. Specify the Name and the Description, and select Data Definition (creation) as the Context.
3. Choose the Insert Variable button to add variables in the Pattern field.
Add annotations and other fields as per need to prepare your template. Here I created the template with all annotations I need for SAP Fiori Elements application.

4. Click on OK.
5. Click on Apply and Close button to save the template.

6. Finally our new template is ready for use. Lets create a ABAP CDS view based on newly created template. Select the custom template

7. Boooom!!! DDL source code is pre-populated based on the template, all you have to do is to replace the table and field names.

Conclusion
Congrats!! you have learned about ABAP CDS view Data Definition Template and also how to create new re-usable template. In your next S/4 HANA project try creating these templates and speed up the development
ABAP CDS Projection view – A new type of CDS entity
Backdrop
ABAP CDS Views are used to define semantic data models on the standard database tables in S/4HANA. It provides enhanced access functions compared to DDIC database tables and Views.
There are currently three types of CDS views available:
- CDS DDIC-based views (DEFINE VIEW),
- CDS Projection views (DEFINE VIEW ENTITY AS PROJECTION) and
- CDS View Entities (DEFINE VIEW ENTITY) – > ABAP 7.55 (or) S/4HANA 2020
What is an ABAP CDS Projection View?
A CDS project view is declared using the statement DEFINE VIEW ENTITY AS PROJECTION in DDL source code using ABAP Development Tools based Eclipse IDE. A projection view is a direct project on exactly one CDS DDIC-based view or CDS view entity and exposes a subset of its elements.
The underlying CDS entity used in the projection view is called a projected entity. The projected entity can be a CDS view without parameters. The DDIC database tables and DDIC database view are NOT allowed as a projected entity.
Syntax of CDS projection view
@AccessControl.authorizationCheck: #CHECK
@EndUserText.label: 'Projection View for BuPa'
define view entity DEMO_SALES_PV_BUPA
  as projection on DEMO_SALES_CDS_BUPA
{

  key id            as BusinessPartnerID,
      given_name    as GivenName,
      middle_name   as MiddleName,
      family_name   as FamilyName

}
The above DDL source code shows the syntax of an ABAP CDS projection view:
- A projection view is defined using DEFINE [ROOT] VIEW ENTITY AS PROJECTION ON.
- From the underlying CDS view DEMO_SALES_CDS_BUPA, all fields and CDS associations of projected entity are exposed.
- A new alias name is given to all fields in the elements list(optional).
- The result set can be further restricted by the addition WHERE.
Virtual elements in CDS projection views
In addition to the projected entity (or) underlying CDS view fields, you can also add/expose new read-only elements using the keyword VIRTUAL.
@AccessControl.authorizationCheck: #CHECK
@EndUserText.label: 'Projection View on Products'
@Metadata.allowExtensions: true
define view entity DEMO_PRD_PV_I_SL
  as projection on DEMO_PRD_CDS_I_SL
  {
    key node_key   as ProductGuid,
      product_id as ProductId,
      type_code  as CategoryCode,
      category,
      supplier_guid as SupplierGuid,
      tax_tarif_code as TaxTarifCode,
      price as Price,

      @ObjectModel.readOnly: true
      @ObjectModel.virtualElement: true
      @ObjectModel.virtualElementCalculatedBy: 'ABAP:ZCL_DEMO_CODE_EXIT'
      cast( '' as abap.char(4)) as Discount
  }
In the syntax above, the class ZCL_DEMO_CODE_EXIT is used to calculate the discount of a product.
For more information, see Using Virtual Elements in CDS Projection Views.
Annotations in CDS projection views
A CDS annotation adds metadata to a CDS entity. The projection view inherits all annotations from the underlying project entity i.e CDS entity except the header annotations.
Following are the ABAP annotations that can be used in ABAP CDS project views.
| Annotation | Usage |
| AbapCatalog.dataMaintenance | To restrict data preview of a CDS projection view |
| AbapCatalog.viewEnhancementCategory | Specifies how to extend CDS projection view using ABAP CDS Extensions. |
| AccessControl.authorizationCheck | Defines access control for the CDS projection view |
| ObjectModel.usageType.dataClass | Specifies the data type of the CDS projection view. For example:- #TRANSACTIONAL, #CUSTOMIZING |
| ObjectModel.usageType.sizeCategory | Specifies the size of the data record that must be scanned to return the result. |
| ObjectModel.usageType.serviceQuality | Defines the quality of the service concerning the performance. |
Consumption View (vs) Projection View
Consumption views are introduced for data modeling as part of the ABAP Programming Model for SAP Fiori.
Both Projection views and Consumption serve the same purpose to simply access of business objects. But with the new ABAP Restful Programming Model (RAP), projects views will be the future replacement for consumption views.
5 Key takeaways
Now that we have a good understanding of ABAP CDS Project Views, let look at some key takeaways and restrictions.
- ABAP CDS projection views can not be used as a data source in other CDS entities.
- They are allowed in ABAP programs as data type definitions and in ABAP SQL select statements.
- Joins and subquery clauses are not allowed.
- CDS projection views can’t directly access a DIDC database table and are always based on existing CDS view models.
- CDS project views do not support Table buffering.
- A CDS projection view can be extended using a CDS view extension.
Conclusion
Congrats!! you have successfully learnt about ABAP CDS Project views, a new type of CDS entity available from S/4 HANA 1909.
ABAP CDS View Entity – A new kind of CDS view in ABAP release 7.55
ABAP Core Data Services (CDS) is the implementation of the general CDS for ABAP. It defines semantic data models on standard tables and optimized them for the SAP HANA database. With ABAP release 7.55 (or) S/4HANA 2020, ABAP CDS view entity, a new type of CDS view. ABAP CDS view entities will replace the DDIC-based CDS views.
History
ABAP CDS view entity, first released with release ABAP 7.40, SP05. It is technically based on a CDS-managed DDIC view in the ABAP Dictionary. A CDS DDIC-based view is defined using the statement DEFINE VIEW.
At present, a CDS DDIC-based view (DEFINE VIEW) create a CDS-managed DDIC view in ABAP Dictionary. Using the CDS annotation @AbapCatalog.sqlViewName, a SQL database view is created upon activation.
As a result, additional maintenance is required and also impact on performance during activation. Following the limitations
- CDS DDIC-based view, and the database view needs to be activated.
- No strict syntax and annotation checks.
- Additional annotation @AbapCatalog.preserveKey: true for the ABAP Dictionary SQL view.
- Explicit client handling algorithm using annotation @ClientHandling.algorithm.
- Long activation time especially with complex hierarichal views.
To overcome the limitations and for better performance CDS view entity are released.
ABAP CDS View entity
The CDS View Entity a new kind of CDS view. A CDS view entity is defined with the statement DEFINE VIEW ENTITY. Similar to the CDS DDIC-based views, CDS view entities are used to model data sources based on database tables or other CDS entities.
It offers more and improved features and most importantly, CDS-managed DDIC view or CDS DDIC-based view is NOT created upon activation.
Sample Code
@AccessControl.authorizationCheck: #NOT_ALLOWED
DEFINE VIEW ENTITY demo_cds_view_entity
 AS SELECT FROM scustom

    JOIN sbook
    ON scustom.id = sbook.customid
     {
           scustom.id,
           scustom.name,
           sbook.bookid
     }
The above sample of the CDS views entity is clean and simple. No view-level additional annotations for SQL view name and client handling. They have the same syntax similar to the CDS DDIC-based views.
The CDS view entity can be used in ABAP programs using ABAP SQL, for example, SELECT * FROM demo_cds_view_entity INTO TABLE @itab …
They are improved version of CDS DDIC-based views. The possible data sources of CDS view entity can be
- DDIC database tables,
- Another CDS view entities,
- CDS table functions,
- CDS hierarchies, or
- CDS DDIC-based views
ABAP CDS View entity – Advantages
CDS view entities are successor of CDS DDIC-based views and bring improved features such as
- No CDS-managed SQL view is generated upon activation.
- Implicit and automatic client handling, hence no annotation is required for client handling.
- Strict syntax and annotation checks during activation.
- Simplified handling of CDS extends
- Faster activation and improved performance.
Restrictions
As the CDS view entity are new and more features will be added in future. Following are the restrictions at the time of writing this blog.
- Select all elements from the data source using SELECT * is not supported in CDS view entities.
- DISTINCT keyword and UNION clause is not yet supported.
- It is not allowed to define a client field in the SELECT list.
Co-Exists
The existing classic ABAP CDS DDIC-based (DEFINE VIEW) view will co-exist along with the new CDS view entity (DEFINE VIEW ENTITY). It is recommended to use CDS view entities instead of CDS DDIC-based view due to technical improvements.
Conclusion
Congrats!! you successfully learned about the ABAP CDS view entity and its improved features. Stay tuned for more ABAP CDS tutorials. If you liked it  , please share it! Thanks!
ABAP CDS Custom Entity in ABAP 7.55 and Restful ABAP Programming Model
ABAP CDS Custom entity is defined using the statement DEFINE CUSTOM ENTITY. A CDS custom entity is a non-SQL (or) no-SELECT CDS entity introduced with ABAP release 7.55 and S/4HANA 2020 FPS00. In this blog post, you will learn about ABAP CDS custom entities and their features.
Let’s get started…
History
ABAP CDS entities are ABAP repository objects used to define data models on the standard tables, particularly the SAP HANA database. It enables code push down through which code optimization is achieved.
In ABAP release 7.55, we can create the following 7 types of ABAP CDS entities.
| CDS View Entities | Improved version of classic CDS DDIC-based views. |
| CDS Projection Views | A direct projection of an underlying any CDS entity. |
| CDS Custom Entities | They are used for data models whose runtime is implemented manually. |
| CDS Hierarchies | Used to create a hierarchy from a data source. |
| CDS Table Functions | Implemented using AMDP Class and functions. |
| CDS Abstract Entities | Describes type attributes and database object instances are created. |
| CDS DDIC-based views | Based DDIC based database views in ABAP Dictionary. |
Here we will be discussing ABAP CDS Custom Entities.
ABAP CDS Custom Entity
A CDS Custom entity is defined using the statement DEFINE CUSTOM ENTITY in the DDL source code using ADT – eclipse-based IDE. The runtime is implemented manually using the ABAP class.
Yes, you heard it correctly!! In other CDS entities, the selection logic to retrieve the data from a data source is defined in DDL source code, but ABAP CDS custom entities do not have a SELECT statement.
ABAP CDS custom entities are non-SQL (or) no-SELECT CDS entities whose runtime is implemented manually by adding an annotation @ObjectModel.query.implementedBy. It requires an ABAP class that implements the select method of the interface IF_RAP_QUERY_PROVIDER.
The CDS Custom entity is available in both SAP Business Technology Platform( SAP BTP ) ABAP Environment and on-premise S/4HANA 2020 FPS00 as part of ABAP Restful programming Model(RAP).
Syntax of CDS Custom Entity
@EndUserText.label: 'Display Supplier List'
@ObjectModel.query.implementedBy: 'ABAP:ZCL_SUPPLIER_LIST'
@Search.searchable: true

define custom entity ZCDS_C_SUPPLIER_LIST
{
  key Supplier      		: supplier_id;
      CompanyCode   		: bukrs;
      BusinessParnter 		: bu_partner;
      PruchasingOrganisation 	: ekorg;
}
The above DDL source code shows the syntax of a CDS Custom Entity view:
- CDS custom entities do not have a SELECT statement.
- The runtime of a CDS custom entity is implemented manually in an ABAP class ZCL_SUPPLIER_LIST
- The class ZCL_SUPPLIER_LIST is referenced in the CDS custom entity using the annotation @objectModel.query.implementedBy.
- The elements of the CDS custom entity are specified and separated by a semicolon. The final element must also be followed by a semicolon.
- Optional, you can add input parameters to the custom entity.
Query implementation class
Following the ABAP Class syntax for custom entity implementation. To complete the implementation the SELECT method of the query provider interface IF_RAP_QUERY_PROVIDER is refined with data retrieval logic.
Note: Before activating the CDS custom entity, we need to create an ABAP class that implements the interface IF_RAP_QUERY_PROVIDER.
CLASS ZCL_SUPPLIER_LIST DEFINITION
  PUBLIC
  FINAL
  CREATE PUBLIC .

  PUBLIC SECTION.
    INTERFACES if_rap_query_provider.
  PROTECTED SECTION.
  PRIVATE SECTION.
ENDCLASS.

CLASS ZCL_SUPPLIER_LIST IMPLEMENTATION.
  METHOD if_rap_query_provider~select.

   "abap code goes here to retrived the data...
  ENDMETHOD.

ENDCLASS.
When to use?
The CDS custom entity is used to define data models whose runtime is implemented manually. The signature of the CDS entity is also separated from the implementation. The following are some of the use cases
- Data can’t be retrieved using ABAP CDS views because of additional business logic which can’t be done with the SELECT ON statement.
- Data has to retrieved from the local database tables along with some partial data from other remote services.
Conclusion
Congrats!! you have successfully learnt about Custom CDS entity.
https://inui.io/sap-abap-cds-views-best-practices/
Comments
Post a Comment